Showing posts with label 101 Cookbooks. Show all posts

Saturday, September 10, 2016

Baked Oatmeal

The little kitchen needs a kick in the ass re-boot. I cook a lot  throw together meals all the time. Usually it happens around 11;00 at night and nothing I feel compelled to capture on camera and it usually involves cheese melted on toast. It's not as dire as it sounds because it's usually really good cheese melted on really good toast with a rub of garlic and a swath of Dijon mustard...maybe some caramelized onions or crispy fried shallots. 
There's the occasional Caprese wrap featuring fresh mozzarella, heirloom tomatoes, basil, balsamic vinegar, olive oil, fresh cracked pepper and a few pinches of  Maldon sea salt, rolled up in a flour tortilla and sliced into cute little pinwheels...I could go on and I will...next time.
Here's the thing. I'm not conjuring up new recipes or pouring over a stack of cookbooks looking for the next best thing. I cook for one. I like to eat good left-overs.  That's the key. Good left-overs. I'll gladly spend half the day in the kitchen if I can chill over the next few days enjoying the spoils the fruits of my labors, labor-free. I like to eat good food, but I don't like to spend a lot of money. I can't spend a lot of money.
I'm fortunate to work in an awesome foodie mecca and from time to time get an early crack at the box of culled produce. Such was the case here...a nice little haul of plums and pluots.

I finally got my mitts on Heidi Swanson's (she, of 101 Cookbooks) beautiful new cookbook Near and Far. This recipe jumped right out at me, oats, nuts, buttermilk, melted butter, maple syrup and stone fruit...<sigh> I've got about 20 recipes bookmarked there, so I better get crackin'.

You know what took this to the next level? a dollop of vanilla creme fraiche! The pan (and the vanilla creme fraiche) lasted 5 days. It was awesome every day. I woke up thinking about that baked oatmeal and the cup of coffee I was gonna be sippin' soon and I swear,  five of the best breakfasts I've ever made.


Tuesday, May 12, 2015

Genius Kale Salad

Do we really need another kale salad recipe? Yes. This may just be the last kale salad recipe I will ever need. It came on my radar last week via Heidi Swanson at 101 Cookbooks ~ she got it from the new cookbook by Food 52~ Genius Recipes: 100 Recipes That Will Change the Way You Cook.
I'm going through another one of those phases where I really need to get off the carb train and make more produce driven meals.
The kale that we get at the market is so beautiful but I lack the inspiration to buy it and make something. The thing is, I love a good kale salad and every time I make one it disappears immediately. Yet, I rarely make them. I saw this on my news feed this week I was all over it. If Food 52 and Heidi make a big deal out of it then there's gotta be something to it.
The genius in this salad is the addition of not one, but two very different cheeses and it's not very often I see the words "good aged cheddar" as a salad ingredient (the other is Pecorino).
I got a little wedge of Mrs. Quicke's Traditional Cheddar from the market. It's an English clothbound aged cheddar just bursting with rich complex flavors. It's important to note that the cheddar should be chopped or crumbled rather than grated. The little nubs of savory, nutty, tangy, caramelly flavors that really good cheddars create within each bite is what makes this salad standout from any other kale salad recipe I've come across.
I couldn't pull this together fast enough. This salad includes roasted asparagus (or roasted winter squash) and almonds, finishing with shaved pecorino. I also added chopped dried cranberries.
I had a little bit of Pecorino Toscano left from my sheep milk cheese tasting last week. It's moister and less salty than Pecorino Romano (a dry grating cheese that's a common substitute for Parmigiano Reggiano) and has a surprisingly zippy flavor. It's a lovely table cheese especially served with sliced pears or peaches.
A little curd-nerdery: Pecorino just refers to an aged, Italian sheep's milk cheese (Pecora is the Italian word for sheep), so there are different types out there, depending on the region where they are made, but the Romano is more widely available. 

Genius Kale Salad                    
Food 52’s Genius Recipes via 101 Cookbooks

1/2 cup chopped asparagus
Extra-virgin olive oil
Salt and freshly ground pepper
1 bunch Lacinato kale, ribs removed, leaves finely sliced, about 2 1/2 cups
1/4 cup almonds cut roughly in half
1/4 cup crumbled or finely chopped good, aged cheddar
1/4 cup chopped dried cranberries (optional)
Fresh lemon juice
Pecorino or any other hard cheese, for shaving

Preheat the oven to 425F. Line a sheet pan with parchment paper.
Toss the asparagus in just enough oil to coat and season with salt and pepper. Spread on the sheet pan, leaving space between each piece. Roast in the oven until tender and caramelized, 20-30 minutes (I used small spears of asparagus which were done in 20 minutes) tossing with a spatula after 10 minutes. Toast the almonds on a baking sheet in the same oven until they start to smell nutty, tossing once, about 10 minutes. Let cool.
In a large mixing bowl, toss the kale with the almonds, cheddar, asparagus and cranberries if using. Season to taste with lemon juice and olive oil (using about 1 tablespoon lemon juice and 2 tablespoons oil). Season to taste with salt and pepper.
Divide onto two plates and finish with shaved pecorino.


Sunday, December 7, 2014

Breakfast Tacodillas

Breakfast Tacodillas, originally uploaded by michele wynne.
Breakfast is and always has been my favorite meal, long before it became a regular in my kitchen, it's always been my favorite meal for dining out.
This is a pretty typical breakfast when I can remember to do it and it's super simple. All you need are some corn tortillas, eggs, cheese and fresh herbs. I also include caramelized onions, roasted peppers and tomatoes when I have them on hand or some corn salsa.
The inspiration for my taco-quesadilla hybrid came about one morning whilst I was noodling around the blogosphere and other time-leeching internet diversions. That day, the hours I spent elsewhere, some how led me to these two recipes that changed the little kitchen for the greater good.  This is a mash-up from my two favorite foodie blogs. I've been making some version of this at least once a week since this taco recipe from Smitten Kitchen caught my eye...then something directed me to this quesadilla recipe from 101 Cookbooks.
Breakfast for one~3 tacodillas:

Assemble whatever assortment of ingredients you have on hand: 2 eggs, 3 corn tortillas, salsa, cheese, herbs etc. I'll usually use whatever cheese I have on hand, but I find fresh goat cheese, feta, or blue cheese or Brie (used here) to be my cheeses of choice.
For this one I used Brie and the last crumbles of some Pt. Reyes Original Blue, caramelized onions, and thyme.
In a small bowl beat the eggs with some salt and pepper. Heat up a little oil in a small non-stick skillet. When the oil is hot, pour in about one third of the eggs, enough to spread to the size of your tortilla. Let the egg set for about 30 seconds and then lay the tortilla over the egg and let that set for another 30 seconds or so until the egg is fused to the tortilla. Carefully flip the whole thing over. Sprinkle some cheese on top of the egg and let it begin to melt. Add any other layers of ingredients. Slide the tortilla onto a plate, folding it in half as you lay it down. Repeat with the remaining tortillas.

Monday, October 27, 2014

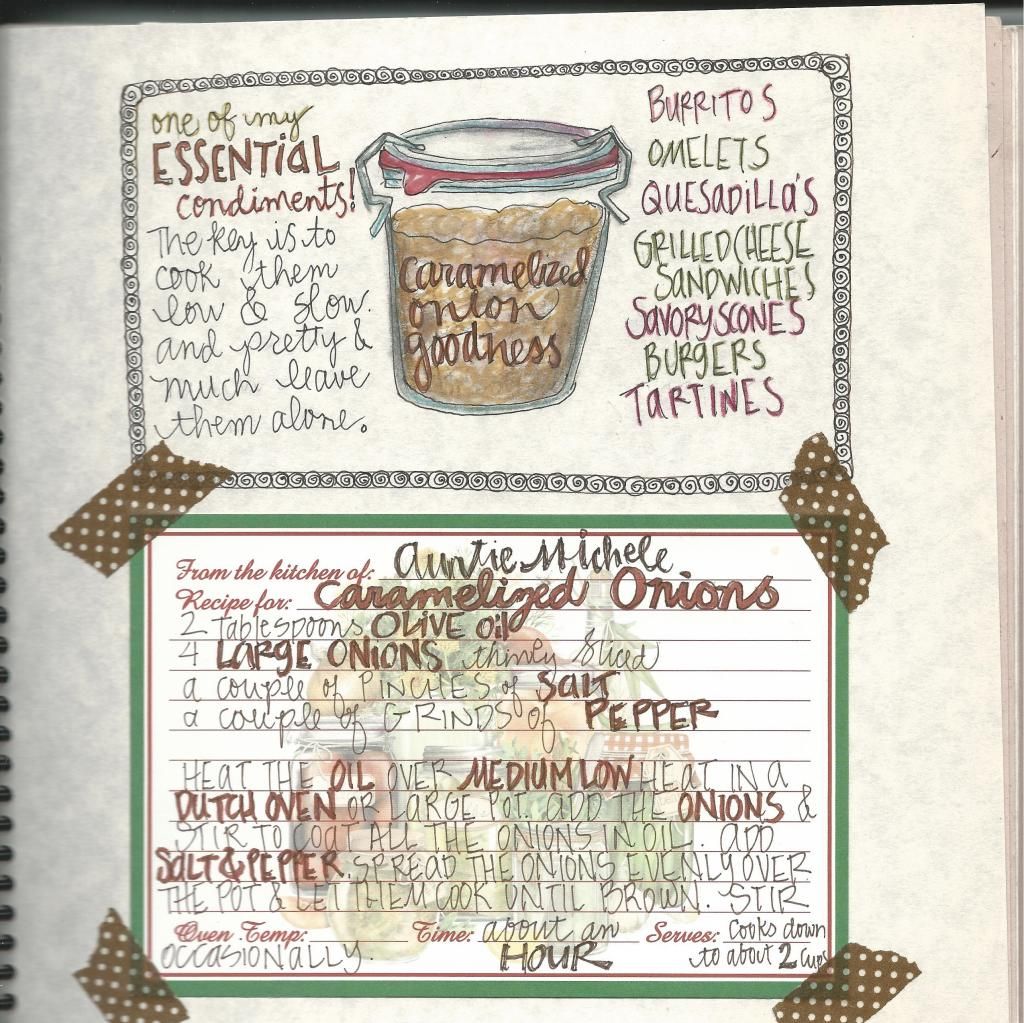
A Page from my Book...


... and  one of my favorite things.  This is a super simple and amazingly delicious way to start a morning. I created an illustrated cookbook for my niece's bridal shower gift last year, a compilation of my little kitchen faves. 
This quesadilla eventually morphed into what I call a tacodilla (a hybrid of these two recipes) inspired by my two favorite blogs 101 cookbooks and smitten kitchen.

Thursday, April 3, 2014

shaved vegetable salad


shaved vegetable salad, originally uploaded by michele wynne.
One of the most valuable lessons (so far) I learned in cooking class at 18 Reasons (or The Big Kitchen as like to call it), is the layered salad. This taste-bud tantalizing method of salad building can turn a mountain of veg into an empty plate and a full belly in no time. I never tire of these.
The beauty of this method is that the variety of textures and flavors make each bite taste different- your palate is continuously engaged, as opposed to tossing everything together with your dressing resulting in a salad that can get boring before it's been finished. This is insanely good. By the time I finished building this it was mountainous. I was reading a book while eating and it seemed quite suddenly my plate was empty.


This Shaved Fennel Salad was a riff on the Buttermilk Farro Salad (link below) I made last week from 101 Cookbooks. I had some of those same veggies left and lots of the buttermilk dressing to use up (which I mixed with a little home made mayo). Build the salad on a large plate or a platter, using 1/2 of each ingredient then repeating the layers. This particular salad went down like this:


arugula
shaved fennel
shaved black Spanish radish
shaved French breakfast radishes
shaved zucchini coins
sliced toasted almonds
chopped dried cranberries
crumbled goat cheese
buttermilk dressing
salt
pepper

Depending on whether the salad is dinner for one or one course of a larger gathering you can scale the number of ingredients up or down.
-Some kind of green: arugula, baby spinach, kale, little gems, spring mix
-2 or 3 (at the most) shaved, thinly sliced or grated vegetables
-toasted nuts
-fruit for sweetness-golden raisins or other dried fruit or mangoes or apples or mandarins
-cheese-goat, feta, shaved parmesan or blue cheese...I like salty cheeses
-salt
-pepper
-dressing drizzled lightly-lemon juice & olive oil work just fine.
Remember to build the salad in two layers.

I've also added avocado or sliced hard boiled eggs to make this a meal.

Thursday, March 13, 2014

Buttermilk Farro Salad


buttermilk farro salad, originally uploaded by michele wynne.


I went to a party last week. I rarely go to shindigs that require dress-up so I was quite distressed to discover that my favorite dress pants were alarmingly snug, you know that unfortunate midriff tightening that turns your pants pockets into gaping mouths, giving the appearance of 18th century panniers (think Marie Antoinette). After my initial horror, I was forced to switch tactics, I yanked off the sparkly t-shirt and replaced it with a dress, that oh-so-chic, 70's revival style of  dress and pants at the same time. I immediately followed that with a very firm commitment to amp up the veggies in my day-to-day kitchen/break-room strategy. Then I went to the party and ate stacks of herbed chicken on focaccia sandwiches, food truck gourmet pizza, and kettle chips (love 'em), rounding it all out with many glasses of white wine and salted lavender cookies.
The very next day...
...enter this really luscious Buttermilk Farro Salad I found over at 101 Cookbooks.
I was bitten with the grain bug when I first made this California Barley Bowl a couple of weeks ago. The addition of a plump nutty grain to any combination of greens and/or vegetables, then tossed with a tangy dressing is an amazingly filling and satisfying meal in a bowl. Toasted nuts, seeds, dried fruit, crumbly cheese, shaved cheese and avocado can be tossed in for more complexity, but that's not necessary in this salad. I had to rein in the urge to prematurely tweak, so I didn't crumble the remnants of my Pt. Reyes Original Blue Cheese over this or fan out some thinly sliced avocado to top things off.
Nope. I stuck to my guns, and followed the recipe as directed because I trust that Heidi knows when enough is enough. Besides, I've got a freezer full of grains to play around with now and as it turned out, this was exactly all that it needed to be.
Two things that make me very happy in a salad are shaved vegetables and buttermilk. I love the word "buttermilk". There's just something warm and fuzzy about it that brings to mind a kindly, apron-clad grandmother in a cotton print dress, baking biscuits in a big country farm kitchen.
Anyhoo, it is time, once again, for the millionth time, to revive the veggie challenge. Except it's not really a challenge anymore. I just need to focus and ignore those diversions that lead me to places like this and this and this.
I also want to share two of my favorite cooking tips:
The first, is strategy for fool-proof cooking of your chosen grain. This is the boil and steam method I got from Jamie Oliver's Food Revolution. It takes some attention, but it you don't have a rice cooker, it turns out a grain to exactly your preference.
The second tip, from 101 Cookbooks (of course), is to cook up a big batches of various grains and freeze in 2 cup portions. I do this with beans too. I use the smaller freezer bags and then insert the filled bags in larger freezer bags.

TO PREPARE THE GRAIN:

  • start with a large pot that either has a steaming insert or will fit a colander inside
  • rinse the grain well in a mesh strainer with lots of cold water
  • put on a kettle of water to boil
  • fill the pot with cold water to about the halfway point or at least twice the volume of grain and bring to a boil
  • add a generous amount of salt and/or bouillion seasoning (if desired)
  • add your rinsed grain
  • boil your chosen grain just until it's chewy
  • drain the grain in a colander
  • cover with aluminum foil pressed down onto the surface of the grain
  • pour some of the boiling kettle water into the pot-about an inch in depth- make sure the water  is not  going to touch the bottom of the colander
  • Turn up the heat to high for a minute or so, until it boils, then lower to a simmer and set the colander into the pot and cover with a lid.
  • Steam for 10 minutes, fluff with a fork and taste. Repeat until it reaches your desired texture of chewiness-just don't let it get soft.


TO FREEZE:


The idea behind this method, rather than rinsing with cold water to quick cool the grain, is not to introduce more water, which will crystalize in the freezer.
  • place a baking sheet in the freezer (or 2 if you have the space)  about the same time you've transferred the colander into the pot to steam.
  • when the grain is ready, remove the colander from the pot and set it on the counter to cool, giving it a toss every now and again to let off steam.
  • remove the baking sheet from the freezer and transfer the grain, spreading it over the entire surface of the baking sheet.
  • let the grain sit for a few more minutes until it stops steaming.
  • place the baking sheet in the freezer for 10 minutes.
  • remove the baking sheet from the freezer and transfer the grain into freezer bags and/or storage containers, depending on the amount you plan to use within the next two days.
TO THAW:
  • Remove the bag of grain from the freezer, open the bag and let it thaw at room temperature for about 15 minutes.
  • Over a mesh strainer, break apart the still frozen pieces to get them out of the bag and tumble the grain into the strainer.
  • Rinse with cold water to break apart the grain, then shake away the excess water (the remaining water will be enough to steam and moisten the grain)
  • Place the grain into a glass bowl and microwave for a minute, remove, stir, taste, then microwave again for a minute, just until the chill is off.


Monday, February 24, 2014

The California Barley Bowl


The California Barley Bowl, originally uploaded by michele wynne.
And now a for brief interlude in my pursuit of macaroni and cheese nirvana, this California Barley Bowl came up on my radar last week via 101 Cookbooks. I was intrigued on a couple of levels. First and foremost: it looked absolutely gorgeous as Heidi's amazing photography always does. I was also amused at a little coincidence that Heidi's inspiration for this recipe came from a new cookbook called Whole Grain Mornings by Megan Gordon. I had just been admiring the book at work a few weeks back when Megan Gordon, the author herself, came by the market to do a demo and book signing.

So when I opened up my email from 101 Cookbooks, I high-tailed it to the store for some arugula and yogurt, feeling pretty damned good about myself for the healthy 180 and the fact that I already had the majority of essential ingredients on hand, including some amazing Sir Prize avocados I managed to snag from the "Sad Produce" box at the market. The surprise about this type of avocado is that from the outside the Sir Prize when at it's optimal ripeness, is dark and super squishy, you'd think it was rotten, yet you cut it open and its the most amazingly vibrant green and yellow and buttery good perfection inside. It's perfect for smashing into guacamole or onto piece of grilled bread, or just spooning it directly into your mouth, not super great for cubing or slicing picture perfectly to fan out and gorgeously garnish your salad top. It's a good thing I'm not into perfection. Really, I'm not.
Anyhoo, this kind of grain bowl one could conjure up with stuff in the fridge and couldn't be easier once you've cooked up your grain of choice and even easier to plan to cook up big batches and freeze it up in 2 cup portions. The frozen package can be pulled out of the freezer, contents dumped into a big mesh strainer or colander, run cold water over it for a minute or so and break up the grains. Put the grain into a microwave safe dish and microwave in 1 minute increments, stirring until the grain is no longer cold. You don't want to get it hot or else it will wilt the greens. I like it when its just slightly warm.
I added some crumbled blue cheese to this and it was amazing and the poached egg? well this is just breakfast bowl nirvana.


Wednesday, August 28, 2013

white bean, slow roasted tomato and caramelized onion tartine

I'm mad for tartines. I like the word tartine. It sounds posh but its not. Its nothing more than an open-faced sandwich,  a piece of toast with a pile of stuff on it. Essentially the components of a good tartine start with a nice slice or two of country loaf toasted and rubbed with a piece of garlic. Next I like some kind of spread, it needs something to anchor the other components. It can be a spreadable cheese, pesto, egg salad, hummus, nut butter or a mashed avocado.  Next would come a vegetable, fruit or deli sliced meat perhaps and then finished with something like balsamic vinegar, honey, sea salt, freshly cracked pepper and some freshly chopped herb. The possibilities are endless. Here's what I used today:

White bean spread (my favorite from Super Natural Every Day)
caramelized onions
roasted tomatoes
fresh basil
Maldon sea salt

I like to cook up big batch of caramelized onions because they are so freaking good and can turn the simplest omelet or sandwich into something amazing. This would have been fine with just the spread and the onions.
There are many different and conflicting approaches to caramelizing onions. I came across this article awhile back that really hit the nail on the head about how and why recipe writers mislead the reader into thinking that the process of caramelizing onions is quicker than it really is.  The articles conclusion states that "the best time to make caramelized onions is yesterday". Ina Garten's approach is "turn your back on them". Low and slow is the key.
I found this yesterday. It's a "How to" blog post with great process photos. I can't even begin to express the beauty of caramelized onions. They're inexpensive, you'll sharpen your knife skills in no time and they practically make themselves.
My next favorite fridge staple is the white bean spread I seem to always have on hand these days. In addition to it being super good, after work, late-night snackage with some baked pita chips, or just spread on my toast, it makes a perfectly awesome bed for holding onto those gooey good caramelized onions and sweet little slow roasted tomatoes. Topped off with some slivered basil and a sprinkle of maldon sea salt and this comes together in no time, providing you've already got your onions in the fridge.  I was finishing them off this morning and I noticed a box of cherry tomatoes I'd forgotten about and in need of urgent care.
To slow roast tomatoes, slice them in half and lay them, cut side up on a parchment lined baking sheet. Brush them with a little olive oil and sprinkle with Maldon sea salt. Roast them at 350 degrees for about 30 minutes. Again, a low and slow approach to roasted tomatoes has its merits too. In Gwyneth Paltrow's first book she roasts plum tomatoes at 200 degrees for 4 hours.  Slivered basil  and Maldon sea salt posh it up

Friday, August 16, 2013

white bean spread and rosemary pita chips

Mission accomplished!...aaaannnnd several firsts. Busy baking pita chips and whizzing up this killer bean spread for the high school reunion picnic on Sunday. It was the first time I've been to one. 35 years! Yikes-I just hope it's not a bunch of old people sharing the deets of menopause and colonoscopies. Hmmmnnnn...was bean dip the best choice? I did soak them over night and cook them with kombu (a strip of kelp that's supposed to aid in bean digestion), another first.
It's the first time I've amped it up for what I'm told will be about 25 people.  I hijacked a little for my lunch. It's from from Heidi Swanson's (ms. 101 Cookbooks) Super Natural Everyday. It's turned out to be such a crowd pleaser. Super simple. Super budget friendly and just plain good. This is a link to the recipe. Now I've got to figure out how to transport it all on my bike.

Tuesday, July 16, 2013

Chicken, Kale & Brown Rice


Chicken, Kale & Brown Rice, originally uploaded by michele wynne.
I am the anti-Gwyneth. I am inspired by her mission to spread healthy eating through-out the land. I truly do aspire to some teensy element of that, if it only be here. Someday? who knows? For now, in my solitary, Kitchen Aid-less little kitchen, I attempt to conjure up good, nutritious food at minimal expense.
So, whilst in temporary possession of GP's latest cookbook, It's All Good, I felt compelled to check out My Fathers Daughter again. I've had my mitts on this cookbook many times, yet this was the first time I zeroed in on the Kale and Brown Rice Bowl. It must have had something to do with  my current obsession with any and all manners of fried rice. So, in my own personal quest at healthier eating, I've put kale (collards and chard, oh my!) at the top of my list.
This is really good. I made a large pan of it and subsequently added  chicken to round out the meal-in-a-bowl concept and I've also topped it with a poached or fried egg and a little grated Parmesano Reggiano for a perfectly satisfying and quickie breakfast.
This is also a little bit of a mash-up of another Kale Brown Rice Bowl recipe I found over at 101 Cookbooks.

Kale and Brown Rice Bowl
adapted from My Father's Daughter
and 101 Cookbooks

1/2 pound lacinato or dino kale, stems removed and sliced into 1/4 inch ribbons
1 1/2 tablespoons olive oil
2 cloves garlic-peeled and minced
1 medium yellow onion, diced
2 1/2 cup brown rice, cooked
1 1/2 teaspoons soy sauce
2 tablespoons za'atar

optional add-ons:
red pepper flakes
cooked chicken
a poached or fried egg
parmesano reggiano
pan fried capers

1. Steam the kale for 7 minutes.

2. Meanwhile, in a large skillet, heat the olive oil over medium high heat and add the diced onions (add optional red chili flakes at this point), a couple of pinches of salt and a grind of black pepper. Cook until the onions are starting to brown and caramelize. Add the garlic and cook for another minute. Add he cooked chicken at this point, toss the pieces around in the pan to heat through, then add the brown rice and kale. Cook and toss until everything is heated through, adding the soy sauce midway through  to deglaze if the pan is getting dry. Finish with small additions of soy sauce to taste.
3. Dish up into a bowl and sprinkle the za'atar over the top.


Monday, July 1, 2013

Mr. Crispy

Lunchtime, originally uploaded by michele wynne.
I can noodle away hours and hours searching for that next best recipe, seeking inspiration and making list upon list of new ingredients to try, cook books to reserve and peruse, restaurants and food shops I want to check out. I hit up my favorite foodie blogs and make more lists. I love lists...making them and then crossing things off them.
A few weeks ago I came across Smitten Kitchen's post about her recent vacation in Italy and I've been thinking about it ever since. She posed this question:

"Where are you going this summer and what can't you wait to eat when you get there?"

I'm not going anywhere, sometimes I think I'll never go anywhere again. But I started a list anyway. Things I would eat in Paris which morphed into Places I would like to eat in Paris. I Googled and Google mapped my way through Paris' eateries.
I couldn't stop thinking of all the travelling I used to do and all the food I didn't eat. I was not an adventurous eater. I dug out the journal from a 1997 trip to Paris that I unearthed during my latest Feng Shui purge. 
I subsisted on a diet of baguettes, brie and beer. There was the occasional addition of  salami (if I came across something that resembled the super-thin slices found in a package of Gallo) when I felt like a splurge. The ultimate indulgence was the rare Omelette Fromage. It's embarassing now to think how delighted I was with myself and my travel saavy resourcefulness, when one day I wandered into a little bistro in the Bastille, later writing, "Where else can you get a sandwich and beer for $4.00!?!?!" Yes, part of it was frugality but I was also the pickiest eater ever. That was my biggest challenge when I travelled. In the Greek Islands, when all of my friends were gorging on calamari, I was eating French fries dipped in Tzatziki sauce.
 What I wouldn't give now to be able to eat my way through Paris. Trying as many classic dishes as I could.  As things stand now I'd have win the lottery or charm a wealthy patron. I have this ridiculous illusion that one of my moneyed chums would be so desirous of my personally tweeked guidance through the arrondisements of Paris that they would insist on our funding a gastronomic assault on its bistros and brasseries.
I would start simply. My current obsession with the Croque Monsieur would be my jumping off point.

#1 Croque Monsieur and Croque Madame: I wouldn't have touched either of these with a ten foot pole back then because I didn't like ham and the whole egg deal in the Croque Madame grossed me out...and the béchamel sauce? What the hell was that all about? Sheeesh!

#2 Boeuf Bourguignon: It was probably out of my budget range back then but even if it weren't I would have been afraid of biting into big fatty hunks of meat. That would have totally grossed me out.

#3 Coq au Vin: see #2
#4 Ratatouille-well...the eggplant.
#5 Yes! I would eat Escargot now! I've never eaten it but if I were ever to get to Paris again, I would do it.

I have been inspired to prepare some of these classic French dishes. First up:

Le Croque Monsieur
(this translates as the Crispy Mister)
It's still a work in progress (I've yet to attempt the béchamel version I've bookmarked in The Barefoot Contessa in Paris) so far, it goes a little bit like this:

2 slices of bread
butter
1/2 cup cheese (gruyere, emmentaler, gouda-anything flavorful that melts well) grated
2 slices of smoked ham-I've also used smoked turkey
caramelized onions
Dijon mustard
Turn on the broiler and on the stove top heat up a skillet on medium high heat. Butter  a couple of slices of bread and place the slices butter side down onto the hot skillet and pile on some grated cheese and cook until the underside of the bread is toasty and golden brown. Transfer the cheesy toasts onto a broiler proof pan and broil a few minutes until the cheese is all melty and bubbly.
Toss a couple slices of cooked Virginia ham into the still hot skillet to heat through then lay the slices on one side of the sandwich and caramelized onion on the other half, just as you remove the pan from the broiler. Spread a little or a lot of Dijon mustard on the ham side and sandwich your two melty slices together and slice in half and you're good to go.

I've made this a couple of times now and it's off-the-hook good. So good I failed to get a decent picture of it. The meal in the photo is a simple grilled cheese sandwich. The Scallion Ramen soup was a concoction I came up with when cleaning my pantry and discovering 3 packages of Top Ramen. I tossed out the flavor packet and made my own starting with a base of Chicken Better Than Bouillion and adding miso, fish sauce, caramelized onions and scallions then tossing in the noodles to absorb all of those great flavors.
The Orzo Salad is topped with a brilliant Salad Booster from 101 Cookbooks.


Monday, April 22, 2013

Vegetable pot stickers


Vegetable pot stickers, originally uploaded by riptideredsf.
This was a first for the little kitchen: Pot stickahzzz!  I spent the entire afternoon making pot stickers.  Why? when my favorite Asian market, New May Wah sells a ginormous bag of 'em for something ridiculous, like 8.99, and Trader Joes are pretty darned good too. I loves to have them in freezer for those nights when I'm just too worn out to make anything and too broke to go out. Pull the bag out of the freezer and toss a handful into hot skillet with some peanut oil and 10 minutes later( providing you've got some left-over rice in the fridge) , dinner is served.
Is it worth the labor involved you may ask? Yes and no. If they taste brilliant then hell yah! This first attempt is not quite there yet but has potential and I'm seeing the dumpling assembly as theraputic, along the lines of garbanzo bean peeling.
I've had this recipe from 101 Cookbooks for Golden Potstickers, a vegetable pot sticker starring yellow lentils, on my to do list for months (prompted by a pantry purge of all the jars of lentils I had decorating my shelf). I used red lentils  and a bunch of excess cabbage I'd shredded up for a slaw that was juuusst about to find its way into the compost bin-thus another refrigerator rescue was born!
Make the lentil pot stickers and the dipping sauce just the way Heidi explains it and they'll be wonderful. But, if you're me and your fridge is always on spoil alert, this lentil base is a great host for a sauteed veggie mash-up. The lentils are cooked and then pulsed in the food processor. The texture is up to you.  If you have a lot of veg to add just make sure it's diced small and perhaps you'll need an extra package of wrappers lest your bowl of filling gets a little whack once you add the vegetables. These freeze perfectly so make as many as you can handle.
The cabbage (or any veg or green that needs to find a greater purpose) goes into a hot skillet with 1-2 tablespoons of peanut oil (I'd gauge it thusly: 1 tablespoon for every 2 cups of veg) , red pepper flakes, chinese 5 spice ( 1 teaspoon for every 2 cups of veg)  and salt (to taste~taste often). Toss the pan to get the cabbage coated and when it's almost soft, (and this is totally optional) dash in some Sriracha, taste it and dash some more if you want...and then  fold the sauteed vegetables into the lentil mix.
Smitten Kitchen just posted a Spring Vegetable Pot Sticker recipe that is definitely going on my to do list.  In addition to the great recipe, she's got some great process pics for folding technique.
Un-wrap the won-ton/pot sticker wrappers and place them into an airtight container or get a damp tea towel to cover the package while you work. I use two spoons to form the filling and have a small bowl of water the moisten the edges of the wrappers. Line a baking sheet with parchment paper or wax paper to place your formed pot stickers on. Sit down at your kitchen table or your coffee table and pop in a French Chef DVD and commence to wrapping. Keep a damp towel over the formed pot-stickers as you work and make sure they aren't touching. When the baking sheet is full put it in the freezer (without the towel) for about an hour. Transfer them into a freezer bag and draw out as much air as you can. Keep the bag in the freezer and when your ready to cook some off, have a half cup of cold water standing by.
Heat up a non-stick skillet (make sure it has a lid to fit) on medium heat with a tablespoon of peanut oil and when the oil starts to shimmer, place the pot stickers flat side down and cook until the bottom just starts to brown. with the lid in one hand pour in the water and place the lid on the pan firmly and cook until the water has reduced by half (about 7 minutes). Remove the lid and continue cooking until the water has evaporated and the bottoms are browned (about more 3 minutes).


Saturday, April 6, 2013

Farro with Coconut Curry Lentil Soup

This was a mash-up of the last of my new favorite soup and finally, a successful attempt at cooking farro. I added a last minute poached egg to top it off. It was divine! 
It's been hit and miss with my few lame attempts at farro, a super healthy whole grain that looks like a cross between brown rice and barley. When cooked properly it has nice chewy texture and a slightly nutty flavor that makes it a hearty base for a main course.
I first came across it when I made this most excellent soup from Smitten Kitchen way back when and it wasn't easy to find back then. Now I get it in the bulk food section at Whole Foods or Rainbow. It's cooking time varies based on the type you buy: Pearled, semi-pearled or plain or I guess, unpearled. The pearling process breaks down the tough outer skin thus reducing the cooking time.
It's not inexpensive, so I've been hesitant to keep at it after having such underwhelming results. But since I've been cooking rice the Jamie Oliver way, I figured I give the farro another go.
Get a large pot of salted water boiling. I also start a full tea kettle to boil as well if I need to add more water later. Spread a cup or so of farro onto a baking sheet and pick out any impurites (if you've purchased the better bagged stuff this is probably not necessary), either way, the next step is to rinse it through a strainer.
When the water has come to a boil, add the farro and keep it at a boil  until it's almost tender (this could take 30-45 minutes so keep an eye on it and add more water if you have to). Then carefully pour the water and farro into a collander that will fit back into your original pot. Cover the farro with aluminum foil, pressing it down onto the surface. Pour about an inch of water (from the kettle) back into the pot and bring it to a boil. Put the collander back into the pot and place a lid on top. Reduce the heat until the water is simmering and then steam it until it's done. Check it every ten minutes and stop when the farro has reached a consistency you like. It took forever but it turned out brilliant. I wasn't planning on eating it that night anyway (I prepare rice and farro in large batches to re-heat for weekday office lunches and too-worn-out-to-cook dinners) so you can just let it go while doing something else. You can reduce the cooking time if you soak the farro overnight.
My current curry obsession led me to this next keeper: Coconut Curry Lentil Soup  from 101 Cookbooks.
Did I mention that this makes a super-tasty and satisfying breakfast with the addition of a fried or poached egg?

Sunday, January 6, 2013

Jamaican Beef Patties


Jamaican Beef Patties, originally uploaded by riptideredsf.
The little kitchen has run amok in pursuit of  pastry perfection in a quest to create the ultimate Jamaican Beef Patty. I also made a crazy-good Mushroom and Caramelized Onion tart.
Jamaican Beef Patties are the bomb, but unless you've been to Jamaica, London, Toronto or the east coast, you've probably never known the fast-food pleasure these spicy little pies can bring. They're the Jamaican version of empanadas. I discovered them back in the 90's whilst pursuing higher education at NYU. Ray's Pizza on Waverly Place, where a big cheese slice and a meat pie could feed the starving student for a mere $3.00, was pretty much a daily habit. So bad, but yet so good.
Those savory crazy yellow pies were greasier than all get-out, filled with spicy ground meat the texture of paste (much like the meat inside those hang-over cure, crack-in-the-box, deep fried tacos), and spiked me up a good 30 pounds in the process.
Fast forward to about a year ago when I first stumble across this vegan version at 101 Cookbooks. I had not thought about these in the 10 years I'd been back in California. Outta sight outta mind. I'm excited by the possibility of reintroducing these into my life-especially a healthy vegan version! I make them and they're almost brilliant. It's the pastry that diminishes it's ultimate perfection. It's ok, but it just doesn't have the  flake I want. I know that's my fault because I suck at pastry.
Looking for the beef, I came across this recipe from Emeril. Again-good, but not quite the flavor I think I remember (which most certainly comes from fast food preservative chemicals).
My ADD-led brain pulls me elsewhere and the Jamaican Beef Patty is abandoned.
Now it's back. I dust off my two recipes and I go a-googling. I'm a bit shocked to discover only a handful of recipes. Why is nobody making these? Empanadas everywhere, but nary a JBP in sight.

Over the weekend I went all ATK on these.


Jamaican Curry Powder
from allrecipes.com
1/4 cup whole coriander seeds
2 tablespoons whole cumin seeds
2 tablespoons whole mustard seeds
2 tablespoons whole anise seeds
1 tablespoon fenugreek seeds
1 tablespoon whole allspice berries
5 tablespoons ground turmeric

Toast the whole spices in a non-stick skillet over medium heat until slightly darkened, about 10 minutes. Grind the toasted spices in a spice grinder with the turmeric.
This recipe makes way more than you need for the meat mixture. It's nice to keep on hand for other things like soup or chicken.

Pastry
adapted from 101 cookbooks

1 1/2 cups all purpose flour
1 cup whole wheat pastry flour
2 teaspoons turmeric
1/2 teaspoon fine sea salt
3/4 cup (1 1/2 sticks) cold butter cut into 1/2 inch dice
1/2 cup plus 2 tablespoons ice water

Meat Filling
adapted from the Food Network

2 tablespoons coconut oil
1 large onion, finely chopped
6 cloves garlic, minced
3 tablespoons Jamaican Curry Powder
1 pound ground beef
1 scotch bonnet or habanero pepper, seeded and finely chopped (optional) or
        1/2 teaspoon red pepper flakes
1 cup beef stock
3/4 cup coconut milk
1 1/2 teaspoons sea salt
fresh ground black pepper
3 tablespoons dark Jamaican rum (optional)
1 tablespoon whole grain mustard

For the pastry: Combine flours, turmeric and salt in the work bowl of a food processor or wisk together in a large mixing bowl. Toss in butter and pulse until it reaches the consistency of fine crumbles, or use a pastry blender, or rub with your finger tips (about 10 pulses or 10 minutes).
Combine the vinegar and water and mix well. Add the water/vinegar mix slowly in the food processor or by the tablespoon into the bowl, while stirring, just until the dough comes away from the side of the bowl. It will still look crumbly, but should hold together when you pinch the dough. Dump it on a floured work surface and squeeze it together into a tight ball, flatten, cover in plastic and refrigerate for at least an hour or over night.
For the filling: Pre-heat the oven to 350 degrees. In a large skillet, on medium-high heat, melt the coconut oil. Add the diced onions and cook until the onions are softened, about 8 minutes, add the garlic and the spice mix and cook for another 2-3 minutes until the spices become fragrant. Add the ground beef, breaking it up and cooking until it loses its pinkness. Add the habanero and beef stock and cook until the liquid reduces. Add the coconut milk and reduce. Season with salt and pepper. Add the rum and reduce. Take off the heat and finish with the whole grain mustard. Let the meat cool for about 30 minutes.

Line a baking sheet with parchment.
Remove the pastry from the refrigerator and divide the dough into 8 pieces. Working with one piece at a time, roll into a ball and then flatten it onto a floured work surface. With a rolling pin, roll into a 6-8 inch circle. Wet the edge of the dough, place a scant 1/4 cup of meat on half the dough and press lightly with your hand or the back of a spoon to flatten it a bit. Fold the dough over the meat and press the edges closed with your fingers and then crimp with a fork.
Pierce the top with a knife to vent.

Bake for 30-35 minutes.


Friday, October 5, 2012

Yellow Split Pea Soup


Split Pea Soup, originally uploaded by riptideredsf.
Every now and again I have a little kitchen epiphany, those moments when I surprise and delight myself by veering out of my comfort zone, fueled by curiosity, imagination, instinct and persistence, landing somewhere strange, wonderful and unexpected. 
This was not one of those moments.
Sometimes it's just dumb luck, boredom or desperation.
It started here:


Sometime last year. Somewhere over at Rainbow, my local natural foods co-op and my happy place for bulk shopping, I found myself particularly mezmerized by legumes.
Let me back up a bit though. The first time I ever walked in there I was transformed. For this, I have to thank Heidi at 101 Cookbooks, another inspiration to the little kitchen. The intro to her cookbook, Super Natural Cooking Everyday, described this Oz-like food shopping experience.   
I feel all fuzzy, warm and virtuous whenever I shop there, always curious & inspired by the amazing towers of beans, lentils, grains, nuts and bins of obscure flours. It excites me more and scares me less now, but at first I was truly overwhelmed by it's strangeness,
I bought bags and bags of colorful split peas, lentils and beans imagining exploration out of my black/refried bean comfort zone, but mostly, I envisioned them pretty-ing up the pantry shelves in my new Ikea glass jars.
 
One year later:
 
The impetus to finally open the jars and consult numerous cookery books and blogs, was more out of neccessity than anything else.


The sporadic employment of a free-lance artist creates adapting to feast or famine. I've been doing this all my working life. The upside to the downside is the creative juices surge in the lean times.
Last week I found myself in the pantry, looking for a project that would keep me busy and out of the store. Is it just me? I can't leave the house, even for a walk around the corner to the library without returning $20 poorer.
Anyhoo...this is what I made. Yellow split peas making their little kitchen debut in this brilliant soup. This was my epiphany: Split Peas?!? Why did I not know about this?!?
Thanks again to Heidi at 101 Cookbooks for this gorgeous recipe. My only deviation was to puree the entire batch. I started, as instructed, with an emersion blender, leaving some texture in there, but some of the peas seemed undercooked to me. I wasn't sure if this is just a characteristic of split peas in general or the fact that my peas were so old...I had also mixed two diffferent batches of dried peas...but once I tossed it into the blender this really came together perfectly. Sweet and creamy and the dollop of cucumber riata  finished off the soup beautifully.

Monday, August 6, 2012

Zucchini & Spaghetti Squash Lasagne

This is an off-the-hook cheezy veggie layered bake that began its journey as a mash-up of two recipes that collided in my ADD-led brain as I managed to fritter away the better part of my morning yesterday on Pinterest.
I would have gladly spent all day at it if it meant finding this at the end of it all: Green Lite Bites my new happy place for some awesome vegetarian inspiration where I was then drawn to this. Two recipes. Similar...but different. I love the look of zucchini sliced whisper-thin and was intrigued by the spaghetti squash. Then again there's always something going on in that fridge that needs to find it's greater purpose stat! So this is how this all went down. I slam the computer shut and run to the produce market...because I'm also making a quinoa corn chowder that needs potatoes and I must get all that going in the slow-cooker. Anyhoo...
I started by cutting the spaghetti  squash in half, removing the seeds and then sprinkling the cut side with salt and pepper and a splash of olive oil. I turned the two cut halves down on the flattest plate I had, jabbed the skin a few times with a fork and nuked it for about 12 minutes. You'd almost think I was a pro at this right? Well...no. This is the first time I've ever prepared or voluntarily eaten a spaghetti squash (I was squashaphobic until about 2 years ago). While the squash was cooking I made
 Five Minute Tomato Sauce (from 101 Cookbooks) :
heat up 2 T. olive oil in a medium sauce pan over medium heat. Add a smashed clove of  garlic, a couple of pinches of kosher salt and about 1/4 t. of red pepper flakes and cook for a couple of minutes until the garlic becomes fragrant. Add a can of crushed tomatoes and cook on medium for about 5 minutes until the sauce is hot. Cover, remove from heat and set aside.
I sliced one large zucchini on a mandoline then tossed it in a bowl with a splash of olive oil, salt and pepper and let it sit a bit so it would exude a bit of water. Then I thinly sliced 4 plum tomatoes and tossed them with a splash of olive oil, salt, pepper, dried oregano, dried basil and dried tarragon and let those sit about 15 minutes to release some water. The spaghetti squash had cooked and cooled a little. Then with a fork, start shredding the squash. It looks like fine egg noodles. I was dubious about the texture, thinking it would be mushy. It was not. Even after baking in the lasagne for 30 minutes the squash had some "tooth". They were still a little crunchy.
I had some ricotta cheese that was teetering on the brink of the trash can, parmesan and some bulk white sliced American cheese (courtesy of my Test Kitchen Dummy) that in my world, should have turned on me long ago, yet it looked and smelled just like it did that day so many months ago when it appeared at my front door, and it tasted just fine...so fine, I had to resist the urge to shove whole slices into my gob.
I started with sauce on the bottom, then layered zucchini,  squash, tomatoes, a sprinkle of dried herbs, salt and pepper, cheeses and then zucchini, sauce...oh and some roasted peppers, just for the heck of it 'cuz I had them roasting for a different purpose but couldn't help but thrown those all in there. I probably didn't need the tomatoes and the sauce but the whole thing turned out so freakin' good that I don't feel like I'd change a thing.

Saturday, August 4, 2012

Breakfast and Cabbage Rolls


Cabbage Rolls, originally uploaded by riptideredsf.
...so good I finished them off for breakfast the next day. I just had no idea that cabbage rolls could be so good. Here's how this little scenario went down:
Last weekend I was riding along with my friend who I affectionately refer to as my Test Kitchen Dummy. He started talking about stuffed cabbage...someone had told him about making it or something or other..."It sounded really good" he said.
I wasn't really following the core of his commentary because suddenly I'm haunted by images of my mothers corned beef and cabbage and my deeply-seeded adversity to the whole salty soggy mess. Whenever I watch cabbage being cooked on TV the "blech factor" kicks in and I turn off. I adore cole slaw but cooked cabbage, other than hidden inside a pot-sticker? No thank you.
"...not that that's a hint at all..." he says. Oh! Who's the dummy in this scenario? I then remember how I made it my mission to try to keep an open mind in the kitchen, paying special attention when it comes to preparing a vegetable I'm trying to re-visit in an enlighted way...those vegetables I hated as a kid and thought I hated as an adult. Eggplant. All things in the squash family. Brussels sprouts. Cauliflower...
Anyhoo, I googled away the entire evening, immersed in images and recipes and cultural traditions of cabbages stuffed and rolled through-out the world. I returned to google images and passed my curser over the very first image and much to my delight, it turned out to be Smitten Kitchen's recipe. I know I should have gone there first, but how can I procrastinate when I'm suddenly inspired to get dressed and go the store and start cooking at 11:00 at night because Smitten inspires me so.
These cabbage rolls were really, really, really good.
I tweaked this recipe the teensiest bit by adding garlic to the sauteeing onions, after testing a tiny cooked patty of the meat mixture I just couldn't resist adding a big blob of my fresh-off-the-plane-from-Paris Dijon mustard from Hediard into my meat mixture. I also remembered I had just bought a bunch of fresh tarragon so I chopped up about a tablespoon and squished that in.
My go-to recipe for tomato sauce comes from 101 Cookbooks. This Five Minute Tomato Sauce is unbeatable, because you can spice it up a notch or two by just adding more red pepper flakes.
TKD: "those cabbage rolls were off the hook!" and he's no doubt gleefully conjuring up his next little kitchen challenge.