Showing posts with label breakfast. Show all posts

Tuesday, March 3, 2015

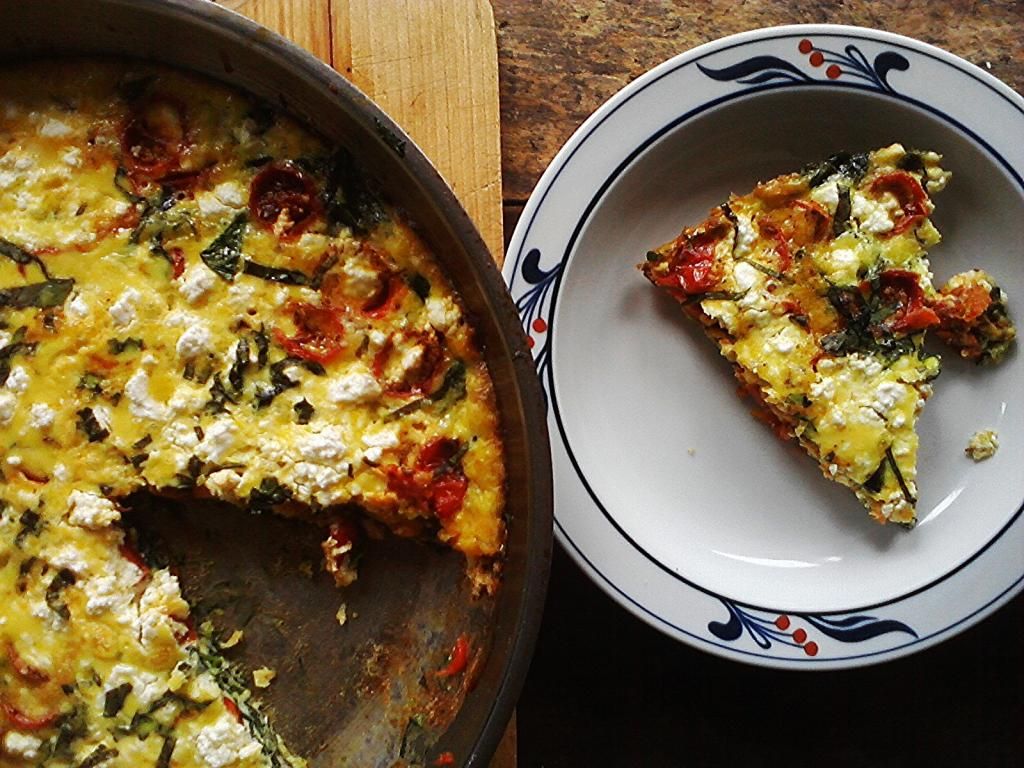
Spinach & Roasted Tomato Frittata


I love frittata's, but the only time I ever make them is when I do the big family breakfast at my sister's on Christmas morning while everyone is still asleep. I make them with the leftovers from our Christmas Eve appetizer party. My sister-in-law always brings the Costco cheese plate and for the last two years, my niece has taken to make what she calls an Astro Weenie Veggie Tree, cocktail weenies and bite-sized crudites skewered with decorative toothpicks onto a big foil covered styrofoam cone -it's pretty awesome but her ambition is undermined by her late-to-the-party timing. By time she's finished chopping and constructing the thing, everyone's already gotten into the sweet and sour meatballs and salami cream cheese roll ups, no one wants veggies. The next morning I deconstruct and cut up whatever is left from the sweet and sour meatballs (usually nothing) and anything else my sister has languishing in the fridge. It's always a crowd pleaser.
This is not that frittata. This is my take on a food52 recipe that showed up on my news feed awhile back, the day after the rare occasion we get leftover frittata in the breakroom at work. I thought, why don't I ever make frittata's for myself? They make great leftovers, the perfect thing to reheat with a small salad when I get home from work hungry.
I had a basket of cherry tomatoes teetering on the edge of the compost bin and it all came together. I slow roasted them. I usually always have feta in the fridge so that night I pondered the cheese selection at work and decided on the Fontina Val d'Aosta, the real deal, made in Italy~a semi-firm, raw milk full flavored cheese. All this time I'd been using fake fontina: fontina style cheese, the red waxed Danish version one finds in the supermarket. There's a big difference. Real Fontina is so much more flavorful and it's more firm than fake fontina which is downright flabby by comparison. 
True Fontina is a great snacker. I had a piece that was a little over 6 ounces. I shredded the 4 or so ounces for the frittata and "tasted" through the remaining bit that I had originally planned for my after-work grilled cheese toast, savoring bite after bite. By the time the frittata came out of the oven the rest was gone.
I love to let a little piece of cheese linger in my mouth for as long as I can. It's like candy.


Spinach & Roasted Tomato Frittata
adapted from food52

1 pound cherry tomatoes sliced in half
1 teaspoon dried thyme or oregano
1 tablespoon olive oil
1 bunch spinach chopped
2 cloves garlic minced
10 big basil leaves sliced into ribbons
7 eggs
4 ounces shredded Fontina cheese
4 ounces feta
salt
pepper


  1. Pre-heat oven to 375 degrees.
  2. In a small bowl, toss the tomatoes with a glug of olive oil, salt, pepper and dried thyme or oregano.
  3. On a parchment lined baking sheet arrange the tomatoes, cut side up so they're not touching. spoon any remaining liquid left in the bowl on top of the cut halves, refilling any that have hollowed out during the tossing. 
  4. Roast for 30 minutes
  5. Heat oil and garlic in a 12 inch skillet over medium heat. Add the spinach and cook down until it is just wilted. Remove from heat and set aside.
  6. Whisk eggs in a big bowl. Add the cooked spinach, fontina, 3/4 of the chopped basil. salt & pepper.
  7. Pour the mixture back into the skillet, top with the tomatoes pressing them down into the mix. Sprinkle on the remaining basil and crumbled feta.
  8. Cook on the stove top, over medium heat until the bottom is just set, about 3 minutes. Slide it into the oven and cook until set, about 15-17 minutes

Monday, January 12, 2015

Cheddar & Jalepeno Scones

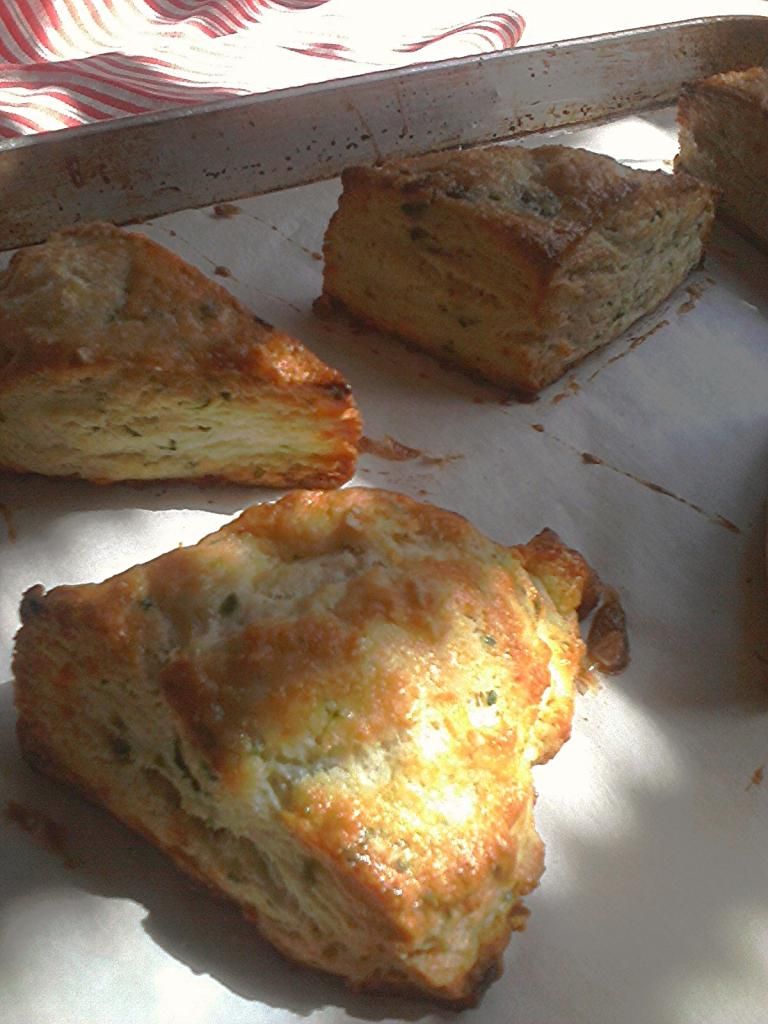
Finally, I got around to making the Cheddar & Jalepeno Scones again. I was in a savory scone zone last year, inspired by some great savory brioche that we were selling at the market.  Last year I made them with Cabot Vintage Cheddar, a beautiful, moist, aged cheddar with a wonderful zippy flavor. It's a waxed cheese, which keeps all the moisture in as it ages and develops all kinds of tasty goodness. It's moisture makes it a great melter and it's my go-to everyday cheese.
This time I changed it up a little and used Cabot Clothbound Cheddar. It's also an aged cheddar but it's drier, a little saltier and savory-er. These are pretty great, even if I did wimp out on the jalepeno heat by scraping out the seeds and ribs. I used 2 large jalepenos, but Serrano peppers can be used as well. I will be making these again with a little more heat.
I bought a large net bag of jalepenos from my neighborhood Chinese market and I just happened to have the Cooks Illustrated: The Science of  Good Cooking checked out of the library. I share their chosen method for storing chile peppers for more than a couple of days, should you find yourself with an abundance of chiles:
Cut the chile's in half lengthwise and submerge them in a jar with a brine of one tablespoon salt to one cup of water. Rinse the chile's off when ready to use. CI does not recommend freezing fresh chiles (unless you can flash freeze them in a cryo-vac/seal-a-meal kind of deal). You'll end up with mushy peppers when they thaw.


Cheddar Jalepeno Scones
adapted from The Kitchn

1 tablespoon butter
2 large jalepeno peppers, seeded, ribs removed and finely minced
2 1/2 cups all-purpose flour
1 tablespoon baking powder
1 tablespoon sugar
1 tablespoon sea salt
1/4 teaspoon baking soda
1/4 teaspoon dry mustard
1/2 cup frozen unsalted butter cut into 1/2" cubes
1 ½ cups good aged cheddar cheese, grated
1/2 cup + 2 tablespoons whole buttermilk
2 tablespoons chopped cilantro
1 egg lightly beaten
Maldon sea salt to finish

In a small sauté pan, heat butter over medium-high heat. When the bubbling subsides add the jalepenos and sauté until soft, 5 minutes. Set aside and let cool completely.

In the bowl of a food processor, pulse the dry ingredients. Scatter the frozen butter over the dry ingredients and pulse until the butter pieces are the size of small peas. Add the cheese, buttermilk, jalepenos & cilantro. Pulse until everything is just combined. The dough will be pretty shaggy but hold together when pinched between your fingers.

Spread a large sheet of parchment paper over a work surface and turn the dough onto it. Using a bench scraper and working the dough as little as possible, shape, press and flatten the dough into either a 1 1/2 inch thick round, if you want larger scones or a 1 1/2 inch thick rectangle, if you will be making mini scones.

Slide the parchment onto a sheet pan and chill in the freezer for about 30 minutes.

Slice the round into 8 wedges, or the rectangle into 2 inch strips then 2 inch squares then slice each square diagonally across to form little wedges.

Return the wedges to the parchment/sheet pan with some space in between each piece. Cover the pan with a sheet of plastic wrap and return to the freezer for at least another 30 minutes or until you're ready to bake them. If you're planning to freeze any of the unbaked scones, continue to freeze for a minimum of 1 hour total. Remove the frozen scones from the sheet pan and transfer into a freezer bag removing as much air as possible. Place the bag inside a second freezer bag and remove air.

Pre-heat oven to 425 degrees. Place the scones on a parchment lined sheet pan. In a small bowl,  beat the egg with a fork. Brush each scone with egg. Sprinkle with pinches of maldon sea salt and bake for 15 minutes until golden, rotating the sheet pan half way through. Let the sheet pan rest on a cooling rack for 5 minutes and transfer the scones directly onto the rack to continue cooling. Serve them while they're still a little warm. Uneaten scones can be left to cool completely and then stored in an airtight container at room temperature.


Sunday, December 7, 2014

Breakfast Tacodillas

Breakfast Tacodillas, originally uploaded by michele wynne.
Breakfast is and always has been my favorite meal, long before it became a regular in my kitchen, it's always been my favorite meal for dining out.
This is a pretty typical breakfast when I can remember to do it and it's super simple. All you need are some corn tortillas, eggs, cheese and fresh herbs. I also include caramelized onions, roasted peppers and tomatoes when I have them on hand or some corn salsa.
The inspiration for my taco-quesadilla hybrid came about one morning whilst I was noodling around the blogosphere and other time-leeching internet diversions. That day, the hours I spent elsewhere, some how led me to these two recipes that changed the little kitchen for the greater good.  This is a mash-up from my two favorite foodie blogs. I've been making some version of this at least once a week since this taco recipe from Smitten Kitchen caught my eye...then something directed me to this quesadilla recipe from 101 Cookbooks.
Breakfast for one~3 tacodillas:

Assemble whatever assortment of ingredients you have on hand: 2 eggs, 3 corn tortillas, salsa, cheese, herbs etc. I'll usually use whatever cheese I have on hand, but I find fresh goat cheese, feta, or blue cheese or Brie (used here) to be my cheeses of choice.
For this one I used Brie and the last crumbles of some Pt. Reyes Original Blue, caramelized onions, and thyme.
In a small bowl beat the eggs with some salt and pepper. Heat up a little oil in a small non-stick skillet. When the oil is hot, pour in about one third of the eggs, enough to spread to the size of your tortilla. Let the egg set for about 30 seconds and then lay the tortilla over the egg and let that set for another 30 seconds or so until the egg is fused to the tortilla. Carefully flip the whole thing over. Sprinkle some cheese on top of the egg and let it begin to melt. Add any other layers of ingredients. Slide the tortilla onto a plate, folding it in half as you lay it down. Repeat with the remaining tortillas.

Thursday, July 24, 2014

Everything Bagel Bombs

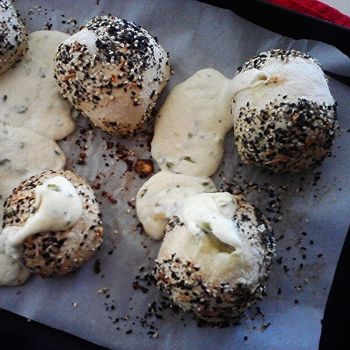
These are wicked. A flavorful scallion cream cheese filling is scooped into little balls and frozen, then wrapped in yeasty dough, washed with beaten egg and coated with an everything bagel mix. As the dough bakes and rises the cream cheese explodes.


I came upon this recipe awhile back at The Amateur Gourmet and became quite obsessed with them. Then, as is habit in the little kitchen, I move on, continuously in search of "the next best thing".
Recently I went back over some of my kitchen faves to compile into an illustrated kitchen journal as a gift for my niece's bridal shower. The bagel bombs were re-tested on the family and all agreed this was a keeper. The link to the recipe has some great step photos.


Bagel Bombs
from the Momofuku Milk Bar Cookbook by Christina Tosi via The Amateur Gourmet
 
Ingredients:
 8 ounces cream cheese (plain, not low-fat)
 One bunch of scallions, green part thinly sliced
 1 teaspoon sugar
 1/2 teaspoon kosher salt + 1/2 tablespoon (for dough) + 3/4 teaspoon for the bagel mix coating
 1 3/4 cups (or 225 grams) flour
 1/4 packet (or 1/2 teaspoon) active dry yeast
 7/8 cups (or 185 g) lukewarm water
 Neutral oil
 1 tablespoon white sesame seeds
 2 teaspoons black sesame seeds
 2 teaspoons poppy seeds
 1 tablespoon dried onions
 1/2 teaspoon onion powder
 1/4 teaspoon garlic powder
 1 egg
 
Method:
Put the cream cheese in the bowl of a stand mixer fitted with the paddle attachment and cream it on medium speed, until fluffy. Scrape down the sides of the bowl and add the scallions, sugar, and salt and mix briefly to incorporate. Taste and add a pinch more salt if you like. Scoop the cream cheese on to a parchment-lined cookie sheet in 8 even lumps and freeze until solid, 1 to 3 hours.

To make the dough, stir together the flour, salt and yeast in the bowl of your stand mixer. Hold the dough hook in your hand and combine the dry ingredients, add the water and continue mixing by hand for 1 minute, until the mixture has come together into a shaggy mess.

Attach the bowl and hook to the mixer and have the machine mix the dough on the lowest speed for 3 minutes, or until the ball of dough is smoother and more cohesive. If the dough is sticky sprinkle in more flour one tablespoon at a time, until the dough releases from the bottom of the bowl.  Knead for 4 more minutes on the lowest speed. The dough should look like a wet ball and should bounce back when lightly poked.

Brush a large bowl with oil and dump the dough into it. Cover with plastic wrap and let the dough proof at room temperature for 45 minutes.

Make the bagel mix by mixing together the salt, sesame seeds, poppy seeds, dried onions, onion powder, and garlic powder. What

Preheat the oven to 325.

Punchdown and flatten the dough on a smooth, dry countertop. Use a bench scraper to divide the dough into 8 equal pieces. Use your fingers to gently stretch each piece of dough out into a flat disc between 2 and 3 inches wide.

Put a frozen cream cheese ball in the center of each dough circle. Bring up the edges of each round and pinch to seal so that the cream cheese ball is completely encased in dough. Gently roll the ball between the palms of your hands to ensure the bomb has a nice, round shape. Arrange the bombs 4 inches apart on a parchment lined cookie sheet.


Whisk the egg and 1/2 teaspoon water together and brush a generous coat of egg wash on the buns. Sprinkle a heavy even coating of the bagel mix all over the bagel bombs~every possible inch, except for the bottoms, should be coated.

Bake the bagel bombs for 20 to 30 minutes. While in the oven, the bombs will become a deep golden brown and a few may have cream cheese explosions. Continue baking until you see this happen! Not to worry–serve them as is or use a small teaspoon to tuck the cream cheese back inside the bagel bomb. Bagel bombs are best served warm out of the oven. Store any leftovers <HA!> wrapped well in plastic wrap, in the fridge for up to 3 days.

 *Make ahead up until baking. Freeze them on a sheet pan then transfer to a freezer bag. They can go straight from the freezer into the oven.


Thursday, March 20, 2014

Polenta with Pan Roasted Asparagus

Yaaayyy asparagus! Love it. Almost as much as I love polenta. Add a flowing stream of warm runny egg yolk and my meal in a bowl is a gorgeous feast.
Asparagus came into the market a few weeks ago and I've been jonesing to make this ever since, but I sort of got side tracked by my current obsession with cauliflower soup and roasting cauliflower and tossing it around in gratins and grain bowls.
I like to buy polenta in bulk when I can, the coarse ground, not the quick cooking type. I'll cook a fairly large batch because I love the leftovers. My basic recipe goes something like this:

4 1/2 cups water
4 teaspoons Better Than Bouillion low-sodium chicken broth base (optional)
1 teaspoon sea salt
1 1/2 cups polenta
2 tablespoons butter
1/2 cup grated Parmigiano Reggiano

Bring the water to a boil in a large pot (that has a lid to fit). Whisk in the broth base if you're using it. Add the salt. Whisk in the polenta. Using a flat edged wooden paddle, continue to stir the polenta until it starts to thicken a little. Turn the heat down to medium and cover the pot. Stir it every ten minutes for a total cooking time of 30 minutes. It may seem like it's done earlier, but it'll be less grainy and sweeter if it continues to cook the full 30 minutes.
Stir in the butter and cheese. If you prefer it creamier add some milk or more water/broth.

This is my favorite way to prepare asparagus:
Snap off the tough ends of the asparagus spears. Heat about a tablespoon of olive oil in a skillet on medium-high heat, when the oil starts to shimmer, add the asparagus spears to the pan so they line up side by side. Add few pinches of large grain sea salt and crushed red pepper flakes. Move the pan back and forth so the oil coats the spears and to allow the seasonings to distribute. Cover and cook for 5-7 minutes, shaking the pan occasionally, until the asparagus starts to brown and is cooked through.
Within my polenta I like to stir in any or all of my favorite flavor enhancers like roasted red peppers, slow-roasted grape tomatoes or caramelized onions. This batch includes all three. Over-kill? Perhaps, but that's just how I roll. Oh yeah...and I crumbled on the last bit of my Pt. Reyes Original Blue Cheese. Oh yeah.


Sunday, September 29, 2013

Quinoa


Quinoa, originally uploaded by michele wynne.
I had this paltry remnant of quinoa lingering in my pantry from a previous Rainbow bulk binge. It would still be there if I hadn't opened up my goop newsletter today. GP has a lot of good rice bowl concoctions in which she combines brown rice with quinoa and then tosses in or tops it with any number vegetables and what-not. Somehow I bounced myself around the blogosphere and ended up jotting down the steps for "How to Make Quinoa Without a Recipe" from a source I forgot to note. I thought it was Food52 but I couldn't find it anywhere.
It goes something like this:
First and super important: RINSE! I forgot to do this once and the result was  bitter.
Put the dried quinoa in a mesh strainer and blast well with water.
Whatever amount of quinoa you're cooking, you'll want to double that volume with water or stock (I love Better than Bouillion Low Sodium Chicken). One cup of dried quinoa yields 3 cups cooked.
I start by boiling a kettle of water and pouring it into a pyrex measuring cup. Stir in the bouillion,
Add a smashed but in tact garlic clove and a good pinch of salt. I drop in a sprig of rosemary and let it steep for about 10 minutes. Fish out the rosemary and pour the liquid into a pot. Bring it to a boil and then reduce the heat to low and simmer for 15 minutes, until the liquid is absorbed and the little white rings have popped up. Turn off the heat. Fish out the garlic (you can chop it up and add it back in) and stir in some finely chopped scallions (1 for each 1/4 cup of dried quinoa).
Add a couple of generous splashes of vinegar, about 1 tablespoon per 1/4 cup of  dried quinoa.
Fluff with a fork. Taste and add more salt if necessary.
Let it sit until cooled and the add in more finely chopped herbs, a drizzle of olive oil and some black pepper.
This is great on its own and left in the fridge to have on hand.
 
Combined with cooked brown rice, it's a great host for:

chopped roasted or grilled vegetables
corn kernals
chopped cherry or heirloom tomatoes
chopped cucumbers
avocado or peppers
marinated vegetables
toasted pine nuts or pepitas
crumbled feta or blue cheese
 
My favorite thing is to have cooked rice and quinoa on hand for any greens like kale and chard that I can rescue from the produce bin at work. I just cut up the greens and sauté then with garlic, olive oil, salt and red pepper flakes and I've got a meal in just minutes.
The next morning a poached egg and shaved parmesan make an awesome breakfast bowl. I made pesto thanks to a basil rescue a couple of days ago.

Wednesday, September 11, 2013

polenta with slow roasted tomatoes...

The upside to being broke is the surge of creativity poverty evokes. The work week pretty much takes care of itself but the days off are where the challenge lays. Typically on those days the little kitchen is a flurry of activity. First the big clean up, fridge and pantry are assessed, cookbooks tagged, foodie websites scoured and email newsletters are perused for more inspiration, and lists are made. 
In the lean times, The Three Amigos are a girls best friend in the kitchen.  This is an amazing trio of condiments that include slow roasted tomatoes, caramelized onions and roasted red peppers. They are cheap to produce and once the prep is done and the peppers are roasted, you can leave the rest alone and go do something else. So for all of about $6.00 I bought 4 pounds of cheap supermarket plum tomatoes (super low and slow roasting transforms cheap flavorless tomatoes), 5 large yellow onions and 3 red bell peppers.  
I like to roast peppers in the broiler. I cut the top and bottom off the pepper, slice the pepper open, remove the seeds and rib, and cut the pepper into 3 or 4 pieces so that they lay down flat in the broiler and will blacken evenly. Remove the green stem from the top piece and lay the two ends in the broiler as well. Keep an eye on them, checking them every 5 minutes. When the skins are all black, remove them and turn the oven down to 250 degrees. Put the peppers into a bowl and cover tightly with plastic wrap and let them steam for about 5 minutes. Lay the pieces on a cutting board and peel the skins off. I use a cheap serrated steak knife and scrape the skins off while using a fork to hold the piece in place.
To roast the tomatoes, slice them in half lengthwise, brush with olive oil and sprinkle a bit of salt on top.  Lay them on parchment  lined baking sheets and roast in a 250 degree oven for about 3 hours. This really depends on the size and quality of your tomatoes. The larger and more watery the tomato, the longer it will take. They will shrink significantly, but there should still be a little burst of super delicious, intense juice when you bite into it. I cooked this batch a little too long and many of the edges were tough. They wouldn't be so great on a sandwich, but were perfect cut up and mixed into this polenta.
The peppers and tomatoes can be stored in airtight jars covered with olive oil for up to a week. I love to use the flavored olive oil for scrambling eggs.
In a moment I can only attribute to serendipity, I opened up my weekly America's Test Kitchen newsletter the next morning to find a gorgeous Creamy Cheesy Polenta staring at me. Oh yes. I pictured the jar of polenta in my pantry, made a couple of notes and I high tailed it home. I took 2 tips from ATK. I used more water and added baking soda (this apparently works on polenta the way it does with beans). It wasn't until the polenta was done, that it occurred to me to add some chopped up roasted tomatoes. I didn't think polenta could get any better. 
I like to cook polenta in a broth made with Better Than Bouillion (low sodium) and a sprig of rosemary, both optional
 
Creamy Cheesy Tomatoey Polenta
adapted from America's Test Kitchen
 
7 1/2 cups water
 1 1/2 tablespoons Better Than Bouillion (optional)
sprig of fresh rosemary
1 1/2 cups dried polenta (don't use the quick cooking kind)
1 teaspoon sea salt
a couple of grinds of pepper
1/2 teaspoon baking soda
2 tablespoons butter
1/2 cup parmesano reggiano
5-6 roasted tomato halves, chopped
2 tablespoons chopped roasted peppers
a bit more salt to taste
a bit more pepper to taste
a poached egg perhaps 
finely slivered basil for garnish
a little shaved parmesan for garnish
 
Bring the water to a boil, stir in the bouillion to dissolve and toss in the rosemary sprig. If using store bought rosemary (which can be dry and prone to start shedding spindles), lower the heat to a simmer for about 10 minutes to extract some flavor  from the rosemary then remove it and any errant spindles before adding the polenta. If you've just snipped it from the garden it will stay in tact and you can fish the whole thing out later, there may be a few spindles, I turn up the heat and bring to a boil again, stir in the salt and baking soda. Slowly pour in the polenta while gently stirring with a flat edged wooden spoon. Turn the heat to low, cover the pot and leave it alone for 5 minutes.  Remove the cover and whisk out any lumps. Cover again and leave it for 20 minutes, or until the polenta has absorbed all the liquid and is tender.
Stir in the butter until it melts. Stir in the cheese. Taste. Add a few pinches of salt, stir and taste until the cheese really sings. You can stop right there...buuut if you're me, you toss in those tomatoes and roasted peppers. Stir, taste, salt, stir, taste until the tomatoes shine through and you've convinced yourself of your genius.
Try to resist just shoveling this into your gob straight from the pot while still standing over the stove.
Poach yourself an egg and slice up a little basil. Spoon the polenta into a bowl, top with the poached egg, crack some pepper on top, shave a little cheese over that and finish with a sprinkling of basil. Done. Done. And. Done.
Oh and purely pure coincidence, after this post was done, I Googled slow roasted tomatoes to get a fix on oven temps and lo and behold,  number one was Smitten Kitchen with this gorgeous post from her archives.

Tuesday, July 16, 2013

Chicken, Kale & Brown Rice


Chicken, Kale & Brown Rice, originally uploaded by michele wynne.
I am the anti-Gwyneth. I am inspired by her mission to spread healthy eating through-out the land. I truly do aspire to some teensy element of that, if it only be here. Someday? who knows? For now, in my solitary, Kitchen Aid-less little kitchen, I attempt to conjure up good, nutritious food at minimal expense.
So, whilst in temporary possession of GP's latest cookbook, It's All Good, I felt compelled to check out My Fathers Daughter again. I've had my mitts on this cookbook many times, yet this was the first time I zeroed in on the Kale and Brown Rice Bowl. It must have had something to do with  my current obsession with any and all manners of fried rice. So, in my own personal quest at healthier eating, I've put kale (collards and chard, oh my!) at the top of my list.
This is really good. I made a large pan of it and subsequently added  chicken to round out the meal-in-a-bowl concept and I've also topped it with a poached or fried egg and a little grated Parmesano Reggiano for a perfectly satisfying and quickie breakfast.
This is also a little bit of a mash-up of another Kale Brown Rice Bowl recipe I found over at 101 Cookbooks.

Kale and Brown Rice Bowl
adapted from My Father's Daughter
and 101 Cookbooks

1/2 pound lacinato or dino kale, stems removed and sliced into 1/4 inch ribbons
1 1/2 tablespoons olive oil
2 cloves garlic-peeled and minced
1 medium yellow onion, diced
2 1/2 cup brown rice, cooked
1 1/2 teaspoons soy sauce
2 tablespoons za'atar

optional add-ons:
red pepper flakes
cooked chicken
a poached or fried egg
parmesano reggiano
pan fried capers

1. Steam the kale for 7 minutes.

2. Meanwhile, in a large skillet, heat the olive oil over medium high heat and add the diced onions (add optional red chili flakes at this point), a couple of pinches of salt and a grind of black pepper. Cook until the onions are starting to brown and caramelize. Add the garlic and cook for another minute. Add he cooked chicken at this point, toss the pieces around in the pan to heat through, then add the brown rice and kale. Cook and toss until everything is heated through, adding the soy sauce midway through  to deglaze if the pan is getting dry. Finish with small additions of soy sauce to taste.
3. Dish up into a bowl and sprinkle the za'atar over the top.


Saturday, November 17, 2012

Big Breakfast Latkes


Big Breakfast Latkes, originally uploaded by riptideredsf.
Within two hours of my finally getting my mitts on the smitten kitchen cookbook, exactly one week ago, I had bookmarked well over half of if its recipes. We've been attached at the hip since. Literally. It's always in my bag. I show it off to my co-workers. I read it on the bus. It sits atop my table at my local cafe provoking comments from hovering patrons whilst standing in line. I take it to bed with a cup of tea, flipping it open to a random page to read or re-read the recipe introductions, re-arranging the color coded neon post-its in an attempt to figure out what to make next. 
I can't believe it's taken me a week to make something from it, but I've finally gotten around to picking number one. This jumped the line-up for several reasons:
~I love potatoes!
~All of the ingredients were on hand.
~I'm always on the lookout for time efficient meal ideas (I can get my butt out of bed a lot quicker for this than for toast-'cuz, you know, I love potatoes) 
~The do ahead note promises the cooked latkes keep well in the fridge and freezer, so the other night I made a double batch 'cuz I knew they'd be gobbled up just as easily for breakfast and dinner.
~I had made my first  Rosti (from Jamie Oliver) a few weeks ago, so Smitten pushed my OCD button and got me thinking about all of the differences and possibilities amongst rosti's, latke's, potato cakes and hash browns.
I've christened my new gem with it's first stain...bacon fat!
Hmnnn...can this still be called a latke if I cooked it in bacon fat? Have I just created a culinary faux-pas?

Big Breakfast Latkes
from the smitten kitchen cookbook

1 large baking potato (1 pound or 455 grams) peeled
1 small onion (1/4 pound or 115 grams) peeled
1/4 cup (30 grams) all-purpose flour
1 teaspoon baking powder
3/4 teaspoon table salt
1/4 teaspoon freshly ground black pepper
1 large egg, lightly beaten
Vegetable or olive oil, for frying (I used bacon fat-Is that bad?)
fried or poached eggs, to serve (optional)

Preheat the oven to 250 degrees. Line a baking sheet with foil, and keep it in the oven until needed.
In a food processor or on a large box grater, coarsely grate the potato and onion. Line a colander with a lint free towel, dump the shredded mixture into the towel-lined colander, gather the ends and wring out as much water as possible. Let it stand for 2 minutes, then squeeze it out again.
In a large bowl, whisk the flour, baking powder and salt, pepper, and egg together. Stir in the potato-onion mixture until all the pieces are evenly coated.
In a small, heavy skillet, heat 2 tablespoons of oil until shimmery or melt some bacon grease.  Divide the mixture into 4 portions and spoon the first one into the skillet and flatten with a spatula into a 5-inch round. Cook the latke over moderate heat until the edges are golden, about 4 to 5 minutes; flip, and cook until golden on the bottom, about 3 to 4 minutes more.
Transfer the latke either to a warmed baking sheet in the oven, or onto a sheet to cool if your planning to keep them around. Repeat process with remaining latke batter in three batches, creating a total of four large latkes
You can either serve the latke whole with a fried egg on top or cut it into 4 wedges, stacked  with a poached egg on top, taking a moment to delight in the yolk running down the slices.

Monday, September 10, 2012

avocado bacon & tomato tartine

The little kitchen was a hotbed of activity this weekend. There's nothing like a tidy kitchen to make me want to mess it up all over again. A clean kitchen is my blank canvas. I perused the possibilities.
I started out by reining in the wildly out of control stacks of photo-copied & printed recipes...things I've yanked out of magazines and the Chronicle Food & Wine section, recipes I've copied from stacks and stacks of cookbooks I've lugged back and forth from the library, those freebie recipe cards from the grocery store and the farmers market info table. I flipped through each and every one, evaluating the who's, what's, where's, why's, and when's.
As much as it pained me I did toss away a good third of the mass accumulation. Some were easy, like the quarter pound beet burger. The photo was gorgeous and all the ingredients seemed managable and it would have fullfilled my adventurous quest at meeting new vegetables but in the end it had to go, so many recipes so little time.
I can not believe how close I came to tossing this one: Dieters Tartine. The title of the recipe turned me off. I hate anything that labels anything as "Diet" food. It immediately sounds restrictive, even if it did come from my guru, Dorie Greenspan's gorgeous "Around My French Table", a gorgeously written and beautifully photographic inspiration of French cookery. I've marched this book back and forth from the library probably 6 or 7 times in the last year.
The ingredient list was small and I had every thing on hand, including a half of a large cucumber that was teetering on the edge of the trash can, two plum tomatoes and about a third of an Italian loaf that was definitely ready for toast.
I chopped up the tomato, cucumber and basil and tossed it with a little salt and pepper. The recipe called for some kind of fancy spreadable french cheese I'd never heard of, but what I did have was a big log of goat cheese that I ended up mixing in with a little greek yogurt to make it spreadable.
The slices of french bread are toasted in the broiler on one side only. My tweak was to rub some garlic on the hot toasted side.
I then spread the cheese and yogurt mix all over the toast, spooned the diced vegetables on top and finishing with a touch of white pepper, sea salt and a few strips of basil.
Super simple, waaay de-lish and kinda elegant.
I tweaked it the next day, adding avocado and bacon crumbles to my leftover vegetable mix from the day before. A Dieters Tartine? not so much.