Showing posts with label lunch. Show all posts

Thursday, June 12, 2014

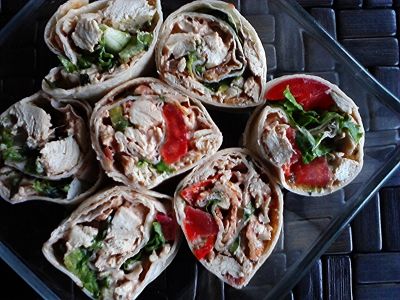
BLTCA pinwheels

This is another one of my office lunch go-to's, a super simple make ahead using either leftover chicken or grill up a chicken breast or two. I cooked up and crumbled some bacon and mixed it with my home made mayo. I added a little adobo sauce to the mayo for some kick, that's why its pink.
Bacon, lettuce, tomato, chicken & avocado.

A great everyday lunch wrap or you can fancy it up by slicing it into pinwheels. Tightly roll, wrap with plastic  twisting the ends. Chill for at least an hour or overnight if you want to make several  up on a Sunday and have one for lunch the next day. This is also a great way to use up leftover salad that's gone wilty.
There's really no recipe for this but here are the components:


cooked chicken breast diced up
cooked bacon crumbled
mayonnaise
salt & pepper to taste

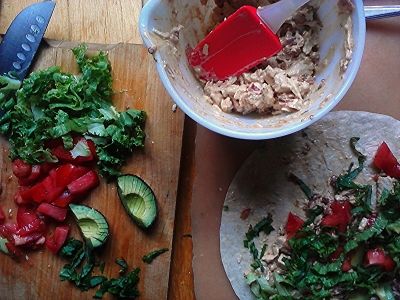
Mix everything together in a bowl and set aside.

several leaves of lettuce, stacked and tightly rolled, then sliced into a chiffonade (thin strips)
one tomato-diced
several basil leaves, stacked and tightly rolled, then sliced into a chiffonade
one avocado halved, then quartered-make a bunch of diagonal cuts to, but not through the skin, scoop the  slices out of the skin with a spoon

On a large tortilla spread about a half cup of the chicken over two thirds of the tortilla. On the top third spread out just some of the mayonnaise so the tortilla will stick at the end.
Top the mix evenly with lettuce, tomato, basil and slices of avocado. Finish with a couple of turns of fresh cracked pepper. 
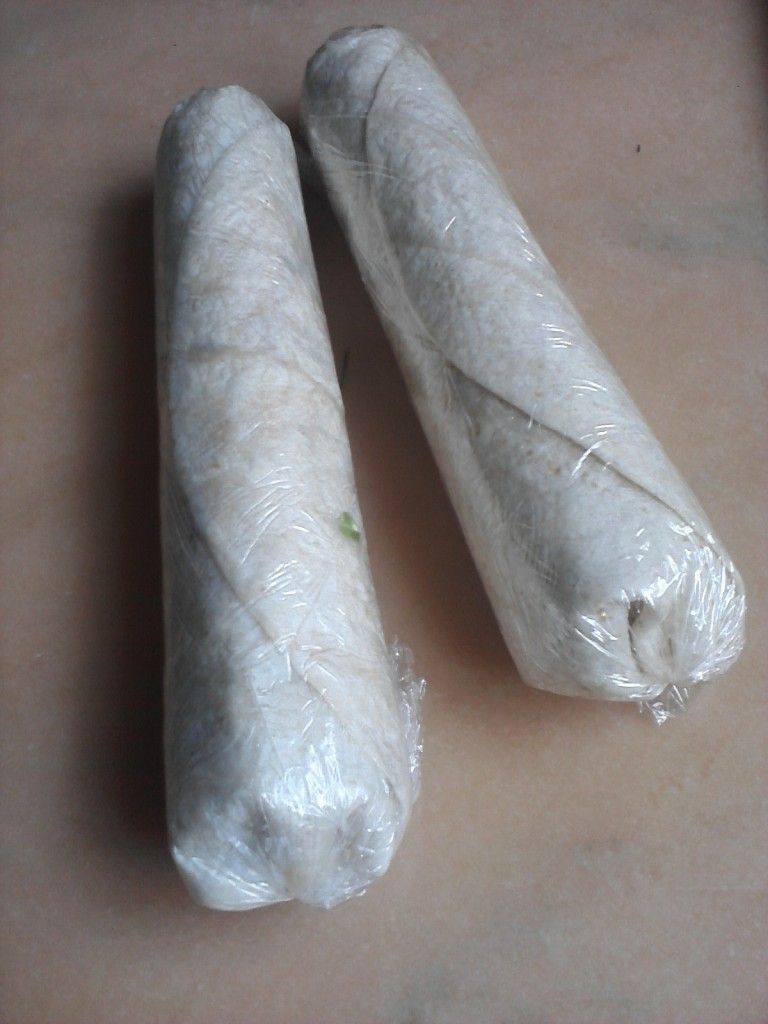
Beginning at the filling end, tightly roll up toward the plain end, you don't need to tuck the sides in.
Tear off a sheet of plastic wrap and lay it flat on your work surface. Place your roll on the bottom edge and center it. Roll it up and then twist the ends tightly. Refrigerate for at least an hour.

Enjoy!


Tuesday, May 6, 2014

Chevre and Roasted Tomato Toasts with Fresh Za'atar

A while back, I spent a rainy "weekend" in the little kitchen cooking up my favorite condiments -The Three Amigos - slooowww roasted tomatoes, caramelized onions, & roasted red peppers. I then cooked up big batches of barley and white beans for the freezer,  hard boiled some eggs, and made a batch of fresh za'atar, (a Middle Eastern herb & spice blend of thyme, oregano, toasted sesame seeds, salt & sumac),
A day in the little kitchen makes the work week meals a breeze.
Simple omelets and grilled cheese sandwiches take on a whole new level of flavor, a quick blitz of  white beans and roasted peppers or slow roasted tomatoes (along with olive oil & lemon juice) in the food processor make up a lovely spread - the perfect snack with some toasted pita chips. Spread all over a big flour tortilla + egg salad + fresh herbs, or sliced lunch meat + caramelized onion + a generous sprinkle of za'atar, roll it up and you're good to go or slice it into pretty pinwheels.
My favorite quickie meal is a tartine or open-faced, loaded toasts. This one consists of slices of crusty country loaf which were brushed with olive oil and toasted in the oven, then rubbed with garlic, next spread with a mixture of chevre & za'atar, topped with slow roasted tomatoes and another sprinkle of za'atar.

Tuesday, October 1, 2013

Roasted Vegetable Tartine


Roasted Vegetable Tartine, originally uploaded by michele wynne.
Well, clearly this will not be winning any beauty contests but I want to start the month focusing  on my commitment to vegetables and I was really thrilled with this impromptu tartine. This is a version of  Refrigerator Rescue. The roasted vegetable medley that sits atop slices of day old Semifreddi loaf toasts and gooey good Carmody cheese, began as small assortment of vegetables I collected the other day from the market where I work. I have come to refer to these particular hauls as Gifts from the Grey Box, culled produce that has been pulled from the market. I wish I'd gotten a picture of the box this day because it really was a sight to behold. A large grey plastic storage box, the kind with an interlocking flip lid, sits propped on its side on a small counter top next to the time clock. Bunny, one of our produce goddesses, had created a gorgeous still life contained within the stage set of the box. I felt a wee wave of guilt disturbing the scene, but I did so for the greater good.

My cast of characters included:

2 small Japanese eggplant
3 purple carrots
1 parsnip
a tiny bunch of broccoli
1 jimmy nardelo pepper (a sweet frying pepper)
2 small zucchini

As soon as I got in the front door I turned on the oven, ditched my coat, kicked off my shoes, grabbed my apron and unloaded my haul. I sliced everything up to about 3/8" thick slices and spread it all out onto 2 parchment lined baking sheets, drizzled and brushed it all with olive oil, sprinkled a bit of  sea salt  and a several grinds of pepper.
Now my roasting technique is a work in progress. I am more and more inclined to go low and slow, but have yet to employ this method with eggplant and carrots on the same baking sheet. This batch went into a 400 degree oven for 30 minutes. I tossed everything around, switched the baking sheets around and set the timer for another 15 minutes. Things got dark, but I absolutely loved the slightly crispy edge that it gave everything and the flavors were all pretty damned tasty.
I ended up with about 4 cups of roasted vegetables. The next morning, half  got chopped up and tossed into a fried rice & quinoa bowl topped with a poached egg and later on, lunch was this tartine.

Dijon mustard and shredded parmesan is stirred into soft butter and then spread onto the sliced bread, then placed butter side down into a hot skillet. Lay thin slices of cheese onto the bread. I found that I can control the cheese better when I use a vegetable peeler to shave the cheese and carefully place the shards onto the bread-I used to grate the cheese but no matter how hard I tried, I'd end up with melted cheese glued to my skillet. I've started using better cheeses and that just won't do anymore.
For this tartine, I used Bellewether Farms Carmody cheese, a semi-soft buttery table cheese. For my grilled cheese type sandwiches and tartines, I like to finish the melting in the broiler, so when the bread is all golden toasty on the bottom, move  the whole skillet (if it's oven-proof) into the oven/broiler or transfer the toasts onto a broiler proof baking pan. I like the cheese a little browned on top. This only takes about 2-4 minutes depending on your broiler so stand guard.
Remove it from the broiler and lay your vegetables on top, pressing a little so they sink into the cheese. Sprinkle with a little grated parmesan and place it back in the broiler for another minute to melt the parmesan.

Friday, August 23, 2013

The Ultimate Grilled Cheese Sandwich

I'm obsessed. I know it, but nothing makes me happier than the grilled cheese sandwich. Just thinking about it makes me all twitchy, especially when I know I've got all the goods in the little kitchen to get this going.  I really wanna go home and make this right now. So I'll make this quick.
After much R & D, I've come to the conclusion that I really like blue cheese in my UGCS along with a Gruyere. I bought a buttermilk blue cheese at work a couple of weeks ago that had just enough bite, it was juuuust right. Because it's not enough for me to dive into the blue cheese, I also love Dijon mustard on my UGCS.
 
So it goes like this:
1. turn on the broiler.
2. Pull out a skillet
3. Butter 2 slices of bread
4. grate and/or crumble your cheese(s)
5. Pull out that jar of caramelized onions you keep on hand-you do that right? nuke a pile of it.
6. Heat up the skillet and lay in the bread, butter side down and pile the cheeses on each half.
7. When the bread is all golden toasty, transfer the cheese covered slices onto an oven-broiler proof pan and place it under the broiler until the cheese is all melty and slightly browned on top. This only takes a minute or two.
8. If you have any sliced lunch meat or leftover grilled chicken or bacon, dump it in the still hot skillet and heat it up
9. When your cheese is melted and maybe even a little browned on top, remove it from the oven, place your sandwich halves on a cutting board and lay some onions on one half, meat on the other half and swipe some Dijon across your meat side and close the book on your sandwich. Slice in half and admire the layers for a second and dig in.
 

Monday, July 1, 2013

Mr. Crispy

Lunchtime, originally uploaded by michele wynne.
I can noodle away hours and hours searching for that next best recipe, seeking inspiration and making list upon list of new ingredients to try, cook books to reserve and peruse, restaurants and food shops I want to check out. I hit up my favorite foodie blogs and make more lists. I love lists...making them and then crossing things off them.
A few weeks ago I came across Smitten Kitchen's post about her recent vacation in Italy and I've been thinking about it ever since. She posed this question:

"Where are you going this summer and what can't you wait to eat when you get there?"

I'm not going anywhere, sometimes I think I'll never go anywhere again. But I started a list anyway. Things I would eat in Paris which morphed into Places I would like to eat in Paris. I Googled and Google mapped my way through Paris' eateries.
I couldn't stop thinking of all the travelling I used to do and all the food I didn't eat. I was not an adventurous eater. I dug out the journal from a 1997 trip to Paris that I unearthed during my latest Feng Shui purge. 
I subsisted on a diet of baguettes, brie and beer. There was the occasional addition of  salami (if I came across something that resembled the super-thin slices found in a package of Gallo) when I felt like a splurge. The ultimate indulgence was the rare Omelette Fromage. It's embarassing now to think how delighted I was with myself and my travel saavy resourcefulness, when one day I wandered into a little bistro in the Bastille, later writing, "Where else can you get a sandwich and beer for $4.00!?!?!" Yes, part of it was frugality but I was also the pickiest eater ever. That was my biggest challenge when I travelled. In the Greek Islands, when all of my friends were gorging on calamari, I was eating French fries dipped in Tzatziki sauce.
 What I wouldn't give now to be able to eat my way through Paris. Trying as many classic dishes as I could.  As things stand now I'd have win the lottery or charm a wealthy patron. I have this ridiculous illusion that one of my moneyed chums would be so desirous of my personally tweeked guidance through the arrondisements of Paris that they would insist on our funding a gastronomic assault on its bistros and brasseries.
I would start simply. My current obsession with the Croque Monsieur would be my jumping off point.

#1 Croque Monsieur and Croque Madame: I wouldn't have touched either of these with a ten foot pole back then because I didn't like ham and the whole egg deal in the Croque Madame grossed me out...and the béchamel sauce? What the hell was that all about? Sheeesh!

#2 Boeuf Bourguignon: It was probably out of my budget range back then but even if it weren't I would have been afraid of biting into big fatty hunks of meat. That would have totally grossed me out.

#3 Coq au Vin: see #2
#4 Ratatouille-well...the eggplant.
#5 Yes! I would eat Escargot now! I've never eaten it but if I were ever to get to Paris again, I would do it.

I have been inspired to prepare some of these classic French dishes. First up:

Le Croque Monsieur
(this translates as the Crispy Mister)
It's still a work in progress (I've yet to attempt the béchamel version I've bookmarked in The Barefoot Contessa in Paris) so far, it goes a little bit like this:

2 slices of bread
butter
1/2 cup cheese (gruyere, emmentaler, gouda-anything flavorful that melts well) grated
2 slices of smoked ham-I've also used smoked turkey
caramelized onions
Dijon mustard
Turn on the broiler and on the stove top heat up a skillet on medium high heat. Butter  a couple of slices of bread and place the slices butter side down onto the hot skillet and pile on some grated cheese and cook until the underside of the bread is toasty and golden brown. Transfer the cheesy toasts onto a broiler proof pan and broil a few minutes until the cheese is all melty and bubbly.
Toss a couple slices of cooked Virginia ham into the still hot skillet to heat through then lay the slices on one side of the sandwich and caramelized onion on the other half, just as you remove the pan from the broiler. Spread a little or a lot of Dijon mustard on the ham side and sandwich your two melty slices together and slice in half and you're good to go.

I've made this a couple of times now and it's off-the-hook good. So good I failed to get a decent picture of it. The meal in the photo is a simple grilled cheese sandwich. The Scallion Ramen soup was a concoction I came up with when cleaning my pantry and discovering 3 packages of Top Ramen. I tossed out the flavor packet and made my own starting with a base of Chicken Better Than Bouillion and adding miso, fish sauce, caramelized onions and scallions then tossing in the noodles to absorb all of those great flavors.
The Orzo Salad is topped with a brilliant Salad Booster from 101 Cookbooks.


Wednesday, February 20, 2013

chicken sausage and bacon curry fried rice


fried rice, originally uploaded by riptideredsf.
I'm a bit obsessed with ethnic inspired rice based dishes lately, since getting my mitts on Jerusalem, the latest, brilliant cookery book by Ottolenghi. The Middle Eastern slant on my own crazy fried rice mash-ups gives me a whole new purpose. I've taken to adding curries, za'atar, sumac, lentils and chickpeas to the standard rice, onion and egg base.
Recipes like this fit into my week so well and my favorite way to use any number of leftovers. It's a great make ahead that's perfect for any meal. I prepare a big batch and then portion it into lunch containers that I can grab and go to work with me or stir into scrambled eggs in the morning or heat up for dinner when I get home and I'm too tired to cook anything.
I make a fried rice at least once a week and it never comes out the same way twice.
This post has been sitting in draft suspension as I attempt to write, write and rewrite a recipe for this particular fried rice. No can do.
I've come to the conclusion-which is exactly where I started-that fried rice is a spontaneous mash-up and cannot be harnessed into precise measurements and cooking time.
Thusly here's the vague process I generally follow:

This one was inspired by a cache of chicken sausages my test kitchen dummy gave me awhile back, frozen and shrink wrapped by his brand spankin' new seal-a-meal-deal. No fancy charcuterie here, just very pedestrian supermarket factory processed keilbasa type links. Not something I generally gravitate to, but always one to accept such gifts with grace and gratitude. I knew a fried rice was their little kitchen destiny.
My general approach to a fried rice is to examine the contents of the fridge and see what jumps out, in other words: Refrigerator Rescue 911.
This one involved a few make aheads:
  • Caramelized onions
  • french lentils (picked over, rinsed then slow cooked for about 4 hours in water with chicken seasoning and fresh thyme).
  • day-old brown rice - I had about 3 cups
other components:
eggs-beaten (approximately 1 egg per cup of rice)
jamaican curry (my home-made blend)
bacon
chicken sausage
soy sauce
leftover sauteed mushrooms
fish sauce
scallions

The most crucial part of the fried rice is the set up, or mise en place as they call it in the culinary world. All of the ingredients prepped and measured (if necessary) into their respective dices and slices, then contained in individual small bowls assembled together on a tray or baking sheet. Not only is everything at the ready when you need it, you won't forget anything either.
The components  of any fried rice begin with aromatics such as onions (if you're not using carmelized), carrots, garlic, ginger  and/or any spice blend one is fond of such as Chinese five spice, curry, or fajita blend. For this one I used up the last of my jamaican curry blend.
Use the largest skilled you have and add 2 tablespoons of olive oil or bacon fat. Turn the heat to medium-high and when the oil is hot add the beaten eggs. Cook and scramble the egg until it's set, then remove from the pan and set aside.
Add 2 tablespoons of oil to the skillet and immediately stir in your preferred spice blend, stirring the spices until they become fragrant, about one minute. Adding the spices at this point allows the flavors to bloom. If you don't have caramelized onions, add about a cup of diced onions to the skillet, stirring them around to coat and lower the heat slightly and cook until the onions start to brown, then add the garlic and/or ginger and cook for another minute.
If you are using previously cooked caramelized onions, hold off adding them until after the meat (if any) you're using is almost cooked,
 
The general order:
hot skillet
oil
scramble egg-remove set aside
spices
other aromatics: onion, carrot, garlic and/or ginger cooked until soft and fragrant
uncooked vegetables
uncooked meat
rice
cooked meat
cooked lentils
spicy roasted chickpeas
add the eggs back
soy sauce
fish sauce
fresh chopped herbs and sliced scallions 
 
Once I've plated or dished out my portions, I like to sprinkle some za'atar over the top. Za'atar is a Middle Eastern spice and herb blend which includes thyme, marjoram, oregano, toasted sesame seeds and sometime sumac. It adds an herby finish  in the end.


Friday, January 11, 2013

caramelized onion and mushroom tart

Two years ago when I started educating myself about cooking, I knew nothing about caramelized onions. I didn't know what "caramelized" even meant. Sure, I'd cooked onions until they were brown, blindly following recipes without any analyzation of the process or result. Sugar in onions? Who knew? A few french onion soups had been produced throughout a lifetime of sporadic cooking, rarely processing the process. It was a  means to an end, satisfying hunger as quickly as possible, or occasional entertainment, and as long as the result wasn't burnt or raw or oversalted and tasted good (which meant edible) , the task was deemed a success, tagged with a bookmark or stuffed into a binder and I moved on.
I discovered a recipe for Onion Jam  in Kim Boyce's Good to the Grain last year. It was only then that  I fully understood the process. Suddenly, all of that browning and caramelizaton talk from Americas Test Kitchen finally made sense. If I had to choose my biggest kitchen AHA! moment, that would be it.
It takes about 90 minutes to cook the onions down their jammy consistency. Onion jam on a BLT is the most amazing thing ever. I mixed some into a tuna salad today that was off-the-hook. Even on a fork, all by itself, it's the ultimate marraige of sweet and savory in one bite. Caramelization is a beautiful thing and shouldn't be rushed. Onions for this tart don't have to be cooked this long though, you want more structure.
I came across this article at Slate.com this morning that was dead-on, humourous and an eye-opener about writing recipes. The writer accuses recipe writers of lying about how long it takes to caramelize onions, because the long cooking time is a deterrent to a recipes appeal. 
The article concludes: "The best time to caramelize onions is yesterday".
Earlier in the week I caramelized about 3 pounds of onions in a dutch oven. I was left with about 2 cups of gooey good onions. It keeps in an airtight jar for a week, though rarely lasts that long. I use caramelized onions in all kinds of ways, the breakfast tacodilla is it's most frequent destiny.

 I've been in  pastry mode for a couple of weeks now, so when I scored  giant bag of button mushrooms from the Chinese market I knew a tart was in my immediate future. This is a hybrid of recipes adapted from Smitten Kitchen and Dorie Greenspan's Around my French Table.

caramelized onions-again, way more than you need for this recipe and do this ahead of time. A dutch oven is great when cooking a large batch because the cast iron has great heat distribution, there's a lot of surface area to promote browning.

2 tablespoons oil
3 large yellow onions (sliced 1/4 thick)
1 teaspoon salt
black pepper
1 teaspoon red wine vinegar

Heat the oil in dutch oven on medium-high heat and then add the onions. Toss until the onions are coated and cook until they start to brown, stirring infrequently, just to redistribute the onions so they come in contact with the surface of the pot. Once the browning starts (it take's about 20 minutes to get there), add salt, lower the heat and cover the pot and cook for another 20 minutes so the onions release their moisture and get really soft.
Remove the cover and continue to cook for another 30 minutes until the water evaporates and the onions become brown. De-glaze with red wine vinegar at the end.

Pastry
from smitten kitchen

1 1/4 cups flour
1 tablespoon plus 2 teaspoons cornstarch
1/4 teaspoon salt
6 tablespoons butter, diced
1 egg

In the food processor pulse the dry ingredients to combine. Pulse butter until it's in bits the size of small peas. Pulse in the egg until the dough forms.
On a floured work surface roll the dough into a 12 inch circle, carefully roll it over the rolling pin to lift it off the counter and into the tart pan. Press the dough into the corner of the pan and trim off the excess. If you're using a fluted tart pan with a removable base lift the tart pan by the edge and put it onto a plate. Cover with plastic wrap and chill for 30 minutes.

filling:

2 tablespoons butter
1 pound white button mushrooms-stems removed, sliced
1/2 teaspoon salt
1 teaspoon dried tarragon
1 cup of beef stock ( or vegetable stock)
1 tablespoon fresh thyme
1/2 cup caramelized onions
2 eggs
1/2 cup heavy cream
1/2 cup fontina cheese (or gruyere)
salt
pepper
nutmeg
1 teaspoon dijon mustard

Preheat the oven to 350 degrees.
Remove the chilled tart shell from the fridge. Line with foil or parchment and weight the pastry down with pie weights, dried beans or rice. I keep a jar of white beans labeled For Pastry and re-use.
Bake for 10 minutes, remove the weights, foil or parchment and bake for another 5 minutes, until the pastry appears dry, but not browning.
Remove from the oven and brush with dijon mustard. Set aside
While the pastry is par-baking (also called blind baking) heat up a  large skillet over medium high heat, melt the butter until it stops foaming. Add the sliced mushrooms and toss to coat, then let them cook undisturbed, about 5-7 minutes until they start to brown. Toss again to redistribute and continue to brown. Add the salt, pepper and tarragon. The mushrooms will release their water. Cook uncovered until the water evaporates and a fond  (the browned bits) forms on the skillet. Add the beef broth and de-glaze the skillet. Continue to cook until the broth reduces. Remove from the heat and stir in fresh thyme.
In a small bowl or a large pyrex measuring cup, wisk the eggs, cream, salt, pepper and nutmeg together then stir in the grated cheese.
Place your par-baked tart shell on a sheet pan, spoon in the caramelized onions and spread it evenly over the bottom. Then add your mushroom layer spreading it evenly over the onions. Pour the egg mixture over the surface.
Place the sheet pan on th middle rack of the oven and bake for 35-40 minutes until the center is puffed and brown. Let it rest for about 10 minutes, remove the fluted ring from the base. Slice and enjoy with a big green salad.
This tart re-heats nicely and I pack it for lunch.


Sunday, January 6, 2013

Jamaican Beef Patties


Jamaican Beef Patties, originally uploaded by riptideredsf.
The little kitchen has run amok in pursuit of  pastry perfection in a quest to create the ultimate Jamaican Beef Patty. I also made a crazy-good Mushroom and Caramelized Onion tart.
Jamaican Beef Patties are the bomb, but unless you've been to Jamaica, London, Toronto or the east coast, you've probably never known the fast-food pleasure these spicy little pies can bring. They're the Jamaican version of empanadas. I discovered them back in the 90's whilst pursuing higher education at NYU. Ray's Pizza on Waverly Place, where a big cheese slice and a meat pie could feed the starving student for a mere $3.00, was pretty much a daily habit. So bad, but yet so good.
Those savory crazy yellow pies were greasier than all get-out, filled with spicy ground meat the texture of paste (much like the meat inside those hang-over cure, crack-in-the-box, deep fried tacos), and spiked me up a good 30 pounds in the process.
Fast forward to about a year ago when I first stumble across this vegan version at 101 Cookbooks. I had not thought about these in the 10 years I'd been back in California. Outta sight outta mind. I'm excited by the possibility of reintroducing these into my life-especially a healthy vegan version! I make them and they're almost brilliant. It's the pastry that diminishes it's ultimate perfection. It's ok, but it just doesn't have the  flake I want. I know that's my fault because I suck at pastry.
Looking for the beef, I came across this recipe from Emeril. Again-good, but not quite the flavor I think I remember (which most certainly comes from fast food preservative chemicals).
My ADD-led brain pulls me elsewhere and the Jamaican Beef Patty is abandoned.
Now it's back. I dust off my two recipes and I go a-googling. I'm a bit shocked to discover only a handful of recipes. Why is nobody making these? Empanadas everywhere, but nary a JBP in sight.

Over the weekend I went all ATK on these.


Jamaican Curry Powder
from allrecipes.com
1/4 cup whole coriander seeds
2 tablespoons whole cumin seeds
2 tablespoons whole mustard seeds
2 tablespoons whole anise seeds
1 tablespoon fenugreek seeds
1 tablespoon whole allspice berries
5 tablespoons ground turmeric

Toast the whole spices in a non-stick skillet over medium heat until slightly darkened, about 10 minutes. Grind the toasted spices in a spice grinder with the turmeric.
This recipe makes way more than you need for the meat mixture. It's nice to keep on hand for other things like soup or chicken.

Pastry
adapted from 101 cookbooks

1 1/2 cups all purpose flour
1 cup whole wheat pastry flour
2 teaspoons turmeric
1/2 teaspoon fine sea salt
3/4 cup (1 1/2 sticks) cold butter cut into 1/2 inch dice
1/2 cup plus 2 tablespoons ice water

Meat Filling
adapted from the Food Network

2 tablespoons coconut oil
1 large onion, finely chopped
6 cloves garlic, minced
3 tablespoons Jamaican Curry Powder
1 pound ground beef
1 scotch bonnet or habanero pepper, seeded and finely chopped (optional) or
        1/2 teaspoon red pepper flakes
1 cup beef stock
3/4 cup coconut milk
1 1/2 teaspoons sea salt
fresh ground black pepper
3 tablespoons dark Jamaican rum (optional)
1 tablespoon whole grain mustard

For the pastry: Combine flours, turmeric and salt in the work bowl of a food processor or wisk together in a large mixing bowl. Toss in butter and pulse until it reaches the consistency of fine crumbles, or use a pastry blender, or rub with your finger tips (about 10 pulses or 10 minutes).
Combine the vinegar and water and mix well. Add the water/vinegar mix slowly in the food processor or by the tablespoon into the bowl, while stirring, just until the dough comes away from the side of the bowl. It will still look crumbly, but should hold together when you pinch the dough. Dump it on a floured work surface and squeeze it together into a tight ball, flatten, cover in plastic and refrigerate for at least an hour or over night.
For the filling: Pre-heat the oven to 350 degrees. In a large skillet, on medium-high heat, melt the coconut oil. Add the diced onions and cook until the onions are softened, about 8 minutes, add the garlic and the spice mix and cook for another 2-3 minutes until the spices become fragrant. Add the ground beef, breaking it up and cooking until it loses its pinkness. Add the habanero and beef stock and cook until the liquid reduces. Add the coconut milk and reduce. Season with salt and pepper. Add the rum and reduce. Take off the heat and finish with the whole grain mustard. Let the meat cool for about 30 minutes.

Line a baking sheet with parchment.
Remove the pastry from the refrigerator and divide the dough into 8 pieces. Working with one piece at a time, roll into a ball and then flatten it onto a floured work surface. With a rolling pin, roll into a 6-8 inch circle. Wet the edge of the dough, place a scant 1/4 cup of meat on half the dough and press lightly with your hand or the back of a spoon to flatten it a bit. Fold the dough over the meat and press the edges closed with your fingers and then crimp with a fork.
Pierce the top with a knife to vent.

Bake for 30-35 minutes.