Tuesday, July 29, 2014

Zucchini Fritters

I can't get enough of these tasty little fritters-so simple and they're a great do-ahead. Topped with a poached egg...well, they are just the thing.
This recipe is a mash-up of two recipes I love. One from Smitten Kitchen and the other from The Longevity Kitchen Cookbook.

I've made these several times over the last two weeks. I've been playing around with spices. I like to add several grinds of Trader Joe's Everyday Spice Blend to the egg mix. I didn't put it in the recipe because it's not really necessary-I just like using those grinders.  The parsley, cilantro, mint medley came to mind as a really nice herb combo, one I had gleaned from the zucchini burgers I made from Jerusalem. I didn't have any mint though.


Zucchini & Sweet Potato Fritters
inspired by smitten kitchen and The Longevity Kitchen Cookbook

2 medium zucchini
1 small sweet potato-about the same size as the zucchini
1 small yellow onion
1 finely chopped scallion-green part only
1 heaped teaspoon coarse or Kosher salt, plus extra to taste
2 medium eggs, lightly beaten
Freshly ground black pepper
¼ cup chopped fresh herbs (I used parsley & cilantro-mint would be good here too)
1/2 cup all-purpose flour
1/2 teaspoon baking powder
sunflower oil for frying

Preheat oven to 200 degrees and place a sheet pan inside.
Trim ends off zucchini, peel the sweet potato, slice the onion in half and peel.  Grate everything either on the large holes of a box grater or in the food processor.
In a large bowl, toss the shredded vegetables with 1+ teaspoon coarse salt and set aside for 10 minutes. Line a colander with a clean tea towel and transfer the grated vegetables into the middle of the tea towel. Gather the ends and twist and squeeze out as much liquid as you can-there will be a lot.
Return the grated vegetables to a large bowl and loosen the compact ball with two forks and stir in your chopped herbs. Taste to see if you need more salt. To the beaten egg add stir in some freshly ground black pepper, then add to the shredded vegetables. In another small bowl, stir together flour and baking powder, then stir the mixture into the veg mix as well.
In a large heavy skillet, heat 2 tablespoons of oil over medium-high heat until shimmering. I like to use two forks to form small dollops of the veg mix into the skillet so there’s space between each pattie. Lightly press them flatter with the back of the fork. Cook the fritters over moderately high heat until the edges underneath are golden, about 3 to 4 minutes. If you find this happening too quickly, reduce the heat to medium. Flip the fritters and fry them on the other side until browned underneath again, about 2 to 3 minutes more. Drain briefly on paper towels then transfer to baking sheet and then into the warm oven until needed. Repeat process, keeping the pan well-oiled, with remaining batter. The fritters should continue to cook in the warm oven for another 10 minutes to finish setting and get a little more crisp.
Stack them up and top with a poached egg.
These fritters keep well, chilled in the fridge for a couple of days though they never last that long.They can also be frozen-place a sheet pan in the freezer, place the cooked fritters on the chilled sheet pan and freeze until solid, about an hour. Transfer the frozen fritters into a freezer bag and drawing or pressing out as much air as possible.
When you’re ready, bake them on a sheet pan, in a 325 degree oven until they’re hot and crisp.


Monday, July 28, 2014

Roasted Tomato & Basil Grilled Cheese

These are a few of my favorite things:

Cheese~my favorite food in the whole wide world. Truly. This particular spur of the moment concoction uses my everyday go-to cheese, Cabot Vintage Cheddar. I have the great good fortune to spend my 40 hour work week in the most amazing and inspiring foodie mecca's in San Francisco, Bi-Rite Market, where my exposure to cheese has opened up a whole new world. Gone are the days of supermarket block mild cheddar and jack. I've ventured into the world of stinky cheese and haven't looked back.

Slooowww Roasted Tomatoes~my little kitchen staple.


Basil-nothing..well, almost ...makes me happier than getting basil to grow on my window sill for more than a week. I've got one going now that's lasted over a month.


Slow Roasted Tomatoes
Pre-heat the oven to 275 degrees.
a pint or two of any small tomato you like-sliced in half lengthwise. In large bowl toss the tomatoes with a good glug of olive oil, sea salt, fresh ground pepper and if you want, some dried herbs such as rosemary, thyme or tarragon.
lay a sheet of parchment paper onto sheet pan and spread the tomatoes out evenly, cut side up. Spoon the liquid left in the bowl back into the cut halves that appear hollow. Use two pans if you need to so the tomatoes aren't crowded.
Bake for 45 minutes.


My approach to the grilled cheese:
Turn on the broiler.
In a small ramekin, start with 2 tablespoons of softened butter & stir in a dollop of Dijon mustard and 2 tablespoons of grated parmesan.
Slather on one side of two thick slices of country loaf bread.
Grate one cup of your favorite cheddar.
In another small ramekin, spoon up some of those slow roasted tomatoes you've got in the fridge, along with the olive oil it's been encased in. Microwave that for about 30 seconds, just to liquefy the oil. Strain this oil into a non-stick skillet and heat on medium. It's going to start spattering, that's the water from the tomatoes-wait until that stops, then place the slices of bread butter side down and let that get all toasty brown.
Transfer the toasty grilled bread, toasty side down on a small sheet pan or broiler pan. Pile on the grated cheese and place it under the broiler for a minute then spread the tomatoes over the melty cheese and broil for another minute. I sprinkled this with za'atar, but fresh ground pepper works just fine.
Remove and let it rest for about a minute and top with some slivered basil.

Friday, July 25, 2014

chicken breasts poached in butter...


...with wine & cream sauce + other recipes from Julia Child.
It may not have been the prettiest girl at the dance but it was pretty damn delicious.

For the last several weeks I’ve been working on a labor of love for my niece’s bridal shower, an illustrated collection of recipes, photos and other kitchen anecdotes which boiled all down to family, friends and food.

Simultaneously, I had returned to “Dearie” the biography of Julia Child I’d started last year, then ADD’d elsewhere. I resumed it at the point she gets to France and the germ of Mastering the Art of French Cooking sprouts. She was relentless in getting each recipe perfect, persevering through battles with her co-authors and the rejections from her first publisher. Her determination and goal-oriented stubbornness paralleled  and motivated my drive to finish my project.
She was obsessed. I was curious. Oddly enough, I've never read Mastering the Art of French Cooking, though I had, somewhere,  The French Chef Cookbook I'd picked up a library book sale years ago. I dug it out and I bookmarked a few things.
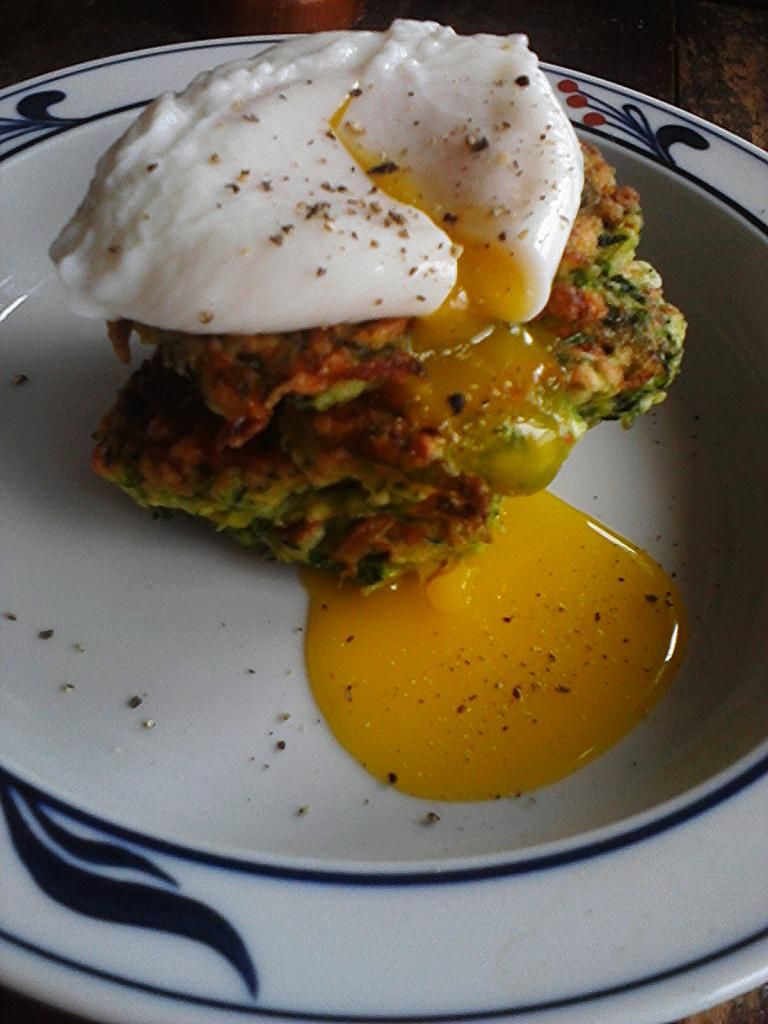
First up: Supremes de Volaille a Blanc or Chicken breasts poached in butter, with wine and cream sauce. A supreme is the skinless, boneless, breast of a chicken removed raw from the whole bird. The recipe calls for 4 "supremes", I cooked 2 fairly large breasts.
The chicken breasts, rubbed with lemon juice, salt & pepper (white pepper-Julia only used white pepper) are oven poached in butter, then a sauce is made from that same chicken juice infused butter by adding broth, wine and cream-I mean seriously what’s not to love about that?

Julia was first and foremost, a teacher and the recipes are fairly idiot proof, even though I bought half and half instead of cream. I thought it was cream, so my sauce never quite emulsified due to the water in the half in half I’m thinking. I whisked really well and it looked beautiful for about 3 minutes then tiny oily globules started to form…well…live and learn. It tasted amazing though. I’m thinking, in part, 
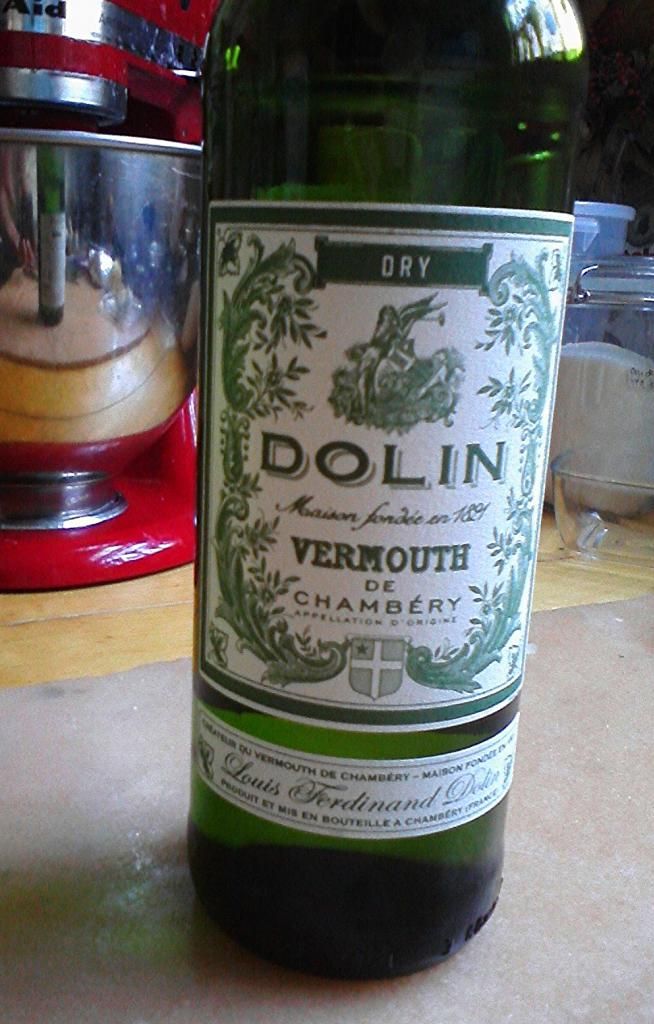
because I didn’t skimp on the vermouth. By that I mean quality. I used this:

I cooked two breasts that were rather large so they took longer to cook. I may have over cooked them the teeeensiest bit. I guess I could have cut them in half or even sliced them since that’s what I did after they were cooked, but I think leaving them whole produces more juice which in turn flavors the sauce. I used Smart & Final brand beef bouillion-yeah I know-it’s all I had (I'm a huge fan of the Better Than Bouillion brand). Whatever. They were delicious! The sauce, in spite of my half and half debacle was rich and flavorful.

I also made a delicious risotto from the book. It's finished in the oven-- super low-maintenance. You  need to start it in some kind of casserole dish that can go from stove top to oven. Julia’s recipe calls for plain white rice. I had some Arborio left so I used it. Super simple. Dice onion, sauté in butter, stir in rice and cook for a minute, pour in bouillion, an herb bag or a bouquet garni of parsley thyme & bay leaf and pop in the oven for 18 minutes. Fluff. Done & delish.

Recipe #3 was Haricots Verts au Maitre D’hotel-or fresh green beans tossed with butter, lemon juice and parsley.

The green beans are blanched then tossed in a dry pan to remove the moisture then seasoned with salt & pepper, tossed with butter and then a splash of lemon juice and chopped parsley. Great recipe. A great way to cook green vegetables-broccoli, asparagus etc.


Cooking the Chicken Breasts

4 supremes
 ½ teaspoon lemon juice
¼ teaspoon salt
Big pinch white pepper
4 tablespoons butter
A heavy, covered casserole dish that can go from stovetop to oven
A round of parchment paper cut to fit the casserole
A hot serving dish

Preheat the oven to 400 degrees.


Method:
Rub the chicken breasts with drops of lemon juice, and sprinkle lightly with salt and pepper. Heat butter in the casserole until foaming. Quickly roll the chicken breasts in the butter, lay the paper over them, cover the casserole, and place in hot oven. After 6 minutes, press tops of suprêmes with your finger; if still soft and squashy, return to the oven for a minute or two more. They are done when they feel lightly springy and resilient; do not overcook them. Remove the suprêmes to a hot serving dish; cover and keep warm while making the sauce, which will take 2 to 3 minutes.

Wine & Cream Sauce:
1/4 cup white or brown stock or canned beef bouillon
1/4 cup port, Madeira, or dry white vermouth
1 cup heavy cream
Salt, white pepper, and lemon juice
2 tablespoons fresh minced parsley

Pour the stock or bouillon and the wine into the casserole with the cooking butter, and boil down rapidly over high heat until the liquid is syrupy. Then pour in the cream, and boil rapidly until lightly thickened. Season carefully with salt, pepper, and drops of lemon juice. Pour the sauce over the suprêmes, sprinkle with parsley, and serve immediately.


Risotto


1/3 cup finely minced onions
2 tablespoons butter
1 cup unwashed raw white rice
¼ cup dry white French vermouth, optional
2 cups light chicken stock heated in a small saucepan
Salt and freshly ground pepper
1 bay leaf (or a small herb bouquet—l small bay leaf, 1/8 tsp thyme, and 3 parsley sprigs tied in washed cheesecloth)

Method:

Sauté the onions slowly in the butter for several minutes until soft and translucent. Stir in the rice and sauté, slowly stirring, for several minutes more until the grains, which first become translucent, turn a milky white. This step cooks the starchy coating and prevents the grains from sticking.
Braising. If you are using vermouth, stir it in now and let it boil down for a moment. Blend in the chicken stock, correct seasoning, and add the bay leaf or herb bouquet. Bring to the boil, stir thoroughly, then cover tightly and finish in the oven, baking for 18 minutes. Do not stir it at all during this time. Check to see if there's any liquid at the bottom and return to the oven for another 2 minutes if necessary. Remove the bay leaf or herb bouquet, fluff the rice with a fork, taste & adjust seasoning if needed.


Green Beans


2 pounds of green beans
6-7 quarts boiling water
2 tablespoons salt
3-4 tablespoons butter cut into 3-4 pieces
salt
pepper
2-3 teaspoons lemon juice
2 tablespoons of minced parsley


Trim the ends off the beans and plunge them into the boiling, salted water. Boil for about 6-8 minutes- I used the skinny French green beans from Trader Joes so they only took 6 minutes to get to a place I like- or until the larger of the beans is tender but still has a slight crunch. This really depends on  the size & quality of your beans. Farm fresh beans will take much less time than beans that have been sitting in the supermarket for a week or whatever. Pluck out a bean, taste it and stop when you like the bite.

Drain immediately and rinse well in cold water. This can be done ahead of time.
When ready to cook, toss the beans in the dry pot over medium heat until any remaining moisture has evaporated. Season with salt and pepper and stir in one piece of butter. Alternate additions of butter and lemon juice. Top with parsley just before serving.

I actually watched that episode on You Tube after and learned that it's important to use a big pot of boiling water because it will return to the boil much faster once you've plunged the beans in. The rapid boil and chill is the key to keeping the vegetables al dente and thusly-PERFECTLY cooked!


Old Dog. New Tricks.


Thursday, July 24, 2014

Everything Bagel Bombs

These are wicked. A flavorful scallion cream cheese filling is scooped into little balls and frozen, then wrapped in yeasty dough, washed with beaten egg and coated with an everything bagel mix. As the dough bakes and rises the cream cheese explodes.


I came upon this recipe awhile back at The Amateur Gourmet and became quite obsessed with them. Then, as is habit in the little kitchen, I move on, continuously in search of "the next best thing".
Recently I went back over some of my kitchen faves to compile into an illustrated kitchen journal as a gift for my niece's bridal shower. The bagel bombs were re-tested on the family and all agreed this was a keeper. The link to the recipe has some great step photos.


Bagel Bombs
from the Momofuku Milk Bar Cookbook by Christina Tosi via The Amateur Gourmet
 
Ingredients:
 8 ounces cream cheese (plain, not low-fat)
 One bunch of scallions, green part thinly sliced
 1 teaspoon sugar
 1/2 teaspoon kosher salt + 1/2 tablespoon (for dough) + 3/4 teaspoon for the bagel mix coating
 1 3/4 cups (or 225 grams) flour
 1/4 packet (or 1/2 teaspoon) active dry yeast
 7/8 cups (or 185 g) lukewarm water
 Neutral oil
 1 tablespoon white sesame seeds
 2 teaspoons black sesame seeds
 2 teaspoons poppy seeds
 1 tablespoon dried onions
 1/2 teaspoon onion powder
 1/4 teaspoon garlic powder
 1 egg
 
Method:
Put the cream cheese in the bowl of a stand mixer fitted with the paddle attachment and cream it on medium speed, until fluffy. Scrape down the sides of the bowl and add the scallions, sugar, and salt and mix briefly to incorporate. Taste and add a pinch more salt if you like. Scoop the cream cheese on to a parchment-lined cookie sheet in 8 even lumps and freeze until solid, 1 to 3 hours.

To make the dough, stir together the flour, salt and yeast in the bowl of your stand mixer. Hold the dough hook in your hand and combine the dry ingredients, add the water and continue mixing by hand for 1 minute, until the mixture has come together into a shaggy mess.

Attach the bowl and hook to the mixer and have the machine mix the dough on the lowest speed for 3 minutes, or until the ball of dough is smoother and more cohesive. If the dough is sticky sprinkle in more flour one tablespoon at a time, until the dough releases from the bottom of the bowl.  Knead for 4 more minutes on the lowest speed. The dough should look like a wet ball and should bounce back when lightly poked.

Brush a large bowl with oil and dump the dough into it. Cover with plastic wrap and let the dough proof at room temperature for 45 minutes.

Make the bagel mix by mixing together the salt, sesame seeds, poppy seeds, dried onions, onion powder, and garlic powder. What

Preheat the oven to 325.

Punchdown and flatten the dough on a smooth, dry countertop. Use a bench scraper to divide the dough into 8 equal pieces. Use your fingers to gently stretch each piece of dough out into a flat disc between 2 and 3 inches wide.

Put a frozen cream cheese ball in the center of each dough circle. Bring up the edges of each round and pinch to seal so that the cream cheese ball is completely encased in dough. Gently roll the ball between the palms of your hands to ensure the bomb has a nice, round shape. Arrange the bombs 4 inches apart on a parchment lined cookie sheet.


Whisk the egg and 1/2 teaspoon water together and brush a generous coat of egg wash on the buns. Sprinkle a heavy even coating of the bagel mix all over the bagel bombs~every possible inch, except for the bottoms, should be coated.

Bake the bagel bombs for 20 to 30 minutes. While in the oven, the bombs will become a deep golden brown and a few may have cream cheese explosions. Continue baking until you see this happen! Not to worry–serve them as is or use a small teaspoon to tuck the cream cheese back inside the bagel bomb. Bagel bombs are best served warm out of the oven. Store any leftovers <HA!> wrapped well in plastic wrap, in the fridge for up to 3 days.

 *Make ahead up until baking. Freeze them on a sheet pan then transfer to a freezer bag. They can go straight from the freezer into the oven.


Monday, July 14, 2014

Rescue Ramen

It started as soup.
This was a refrigerator rescue I concocted whilst house sitting awhile back. I was a stones throw away from my favorite Asian market, New May Wah on Clement Street & 8th Avenue. I love their amazing assortment of frozen dumplings and other potsticker type bites. Along with the array of sauces and the lure of DirectTV back at the house, I was a hermit for close to 3 days, resurrecting my old New Years Eve tradition of an enormous dumpling appetizer dinner, Cosmopolitans and a Sex & the City marathon. Good times.
The leftovers found their way into the pot.
I had also picked up a bag of ramen noodles, six curly compressed rounds packaged much like rice cakes.There was an unfortunate clamshell of grape tomatoes in my host refrigerator that begged to be rescued. Of course I slow roasted them. I also had a bag of mixed frozen vegetables at home. This was much more dense than my usual 3-1 broth-to-stuff ratio.

Method:

bring a big pot of water to a boil-this was 6 quart dutch oven with about 4 quarts of water, then reduce to a simmer.
Better Than Bouillon Vegetable Base-about 2 tablespoons- let it dissolve and taste.-just enough that the water takes on some flavor. Add some salt at this point if necessary. Seasoning at this point is more for flavoring the noodles that will cook in the broth.
a garlic clove or two finely chopped & smashed with coarse salt using the side of a knife
add potstickers if you have them-either your leftover cooked ones or frozen (let them cook through for about 7-8 minutes)
   *I used both ramen and potstickers just because I had them-but either one alone is fine
frozen vegetables
a bunch of scallions, thinly sliced, white parts in the pot first-hold off on the greens until the end
any raw vegetables you're trying to use up, diced
ramen noodles-I used one of the cake rounds
add the roasted tomatoes-THIS is what takes the soup up to a brilliant level!!
add salt & pepper to taste
finish with the scallion greens
you can also use up leftover cooked chicken-shred it or dice it.
leftover cooked vegetables work too-dice them up and add them at the end

This particular batch was big and dense. It lasted through the house-sit.  By the last day, most of the broth had been reduced away leaving behind the perfect nest for a couple of poached eggs.
I felt pretty smug whilst OCD'ing on all that foodTV.