Tuesday, January 15, 2013

not michele's little kitchen

I was noodling around in the archives and found this. My very first post from November 2, 2010. It had been sitting in draft suspension.

I had to photograph this great stove (oh! and my mise). This is soooo NOT my kitchen. I'm house sitting, cooking smitten kitchen's mushroom bourguignon on a big fancy stove-top grill. This grill IS the inspiration and launching pad for Michele's Little Kitchen. Well, there are a couple of things that inspired and launched this blog. Many firsts occurred this week and the culmination was just overwhelming enough to spew forth the need to write it all down.

It started with a Weight Watchers vegetable challenge. Never been a big fan I have to say, of vegetables that is, not WW- but it sparked my OCD and in an attempt to channel it to the greater good, I decided to embrace the veg.  
I start with my old copy of Vegetarian Cooking for Everyone (a cookbook club acquisition I'd barely cracked) and got to tagging. A list is made and I'm off the local produce markets. I suddenly had visions of veggie kabobs dancing on this grill. Squash, Zucchini and eggplant-vegetables I wouldn't touch with a ten foot pole a few short years ago, now, planning a trip to the produce market is enough to make me giddy with anticipation. 
First lesson learned? a little olive oil, salt and pepper can make an old shoe taste good.

It was Smitten Kitchen's  Mushroom Bourguignon that was the real game-changer though.  I had no idea how rich, meaty and lush mushrooms could be.

Monday, January 14, 2013

carrot soup with lemon tahini drizzle and toasted chickpeas

I woke up the other morning to find the food blogosphere all about chickpeas and carrots. These are just s few of the recipes I latched onto:

smitten kitchens latest carrot soup- I've made this twice last week-it's sooooo simple!
101 cookbooks morrocan carrot soup-I haven't made this yet but it's on the queue for Le Weekend
Amateur Gourmet's Anything Goes Salad-I've made this wonderful chopped salad a few times now. It's a great work salad because it's perfectly fine in the refrigerator for a couple of days, so I can make a lot.

The Smitten Kitchen Carrot Soup appeared first and there was absolutely no reason not to jump right into this because I had all of the ingredients on hand-the usual bunch of carrots, just waiting for their greater purpose, the questionable dregs of a jar of tahini (does tahini have a shelf life? he jar says nothing!),  a near empty jar of dried chickpeas and a newly purchased bag of za'atar (an new stranger to the little kitchen inspired The Amateur Gourmet salad up above).
I had to laugh when I read Deb's comment about her self-imposed carrot soup challenge, as it sounded very akin to my own evolution with most vegetables.
The soup is sooooo simple and flavorful on its own, but the addition of the tahini & lemon added that little kick of brightness. My drizzle work needs some finessing and it's far too fussy a finish for a simple carrot soup, but couldn't help myself after I'd poured that vibrant bowl of orange. The soupy canvas seemed to call to my squeeze bottle.
An equally inspiring discovery was the toasted chickpea. I've never toasted chickpeas before and when I pulled them out of the oven and tasted them I was blown away by how good they were...salty & spicy with a touch of crunch...just a brilliant snack all on their own.
Carrot soups collided today. A new cooking school recently popped up on my  radar.
Scanning their website, I discovered they were having an open house today. I pedaled by to check it out. It was inspiring and enlightening.
They demonstrated 4 recipes including a curry carrot soup. It was good. Thick and spicy...but not as good as this. A lot of curry and a lot of milk and cream. Not that there's anything wrong with that. If I hadn't just made this, I probably would have been singing the praises of that curry carrot soup. It was a tad more work (roasting carrots-and I looooovvvve roasted anything) than this super simple SK soup (everything gets tossed into the pot and sauteed-add stock-cook until carrots are soft-puree-done). 
Something I took particular note of: the chef/instructor said never to garnish a soup wth something that was not already a component of the soup. Hmmnnn...What am I to make of that? I loved the tahini swirl and toasted chickpea croutons.
Nevertheless, the carrot soup is definitely a keeper and I shall roast the carrots next time.

Friday, January 11, 2013

caramelized onion and mushroom tart

Two years ago when I started educating myself about cooking, I knew nothing about caramelized onions. I didn't know what "caramelized" even meant. Sure, I'd cooked onions until they were brown, blindly following recipes without any analyzation of the process or result. Sugar in onions? Who knew? A few french onion soups had been produced throughout a lifetime of sporadic cooking, rarely processing the process. It was a  means to an end, satisfying hunger as quickly as possible, or occasional entertainment, and as long as the result wasn't burnt or raw or oversalted and tasted good (which meant edible) , the task was deemed a success, tagged with a bookmark or stuffed into a binder and I moved on.
I discovered a recipe for Onion Jam  in Kim Boyce's Good to the Grain last year. It was only then that  I fully understood the process. Suddenly, all of that browning and caramelizaton talk from Americas Test Kitchen finally made sense. If I had to choose my biggest kitchen AHA! moment, that would be it.
It takes about 90 minutes to cook the onions down their jammy consistency. Onion jam on a BLT is the most amazing thing ever. I mixed some into a tuna salad today that was off-the-hook. Even on a fork, all by itself, it's the ultimate marraige of sweet and savory in one bite. Caramelization is a beautiful thing and shouldn't be rushed. Onions for this tart don't have to be cooked this long though, you want more structure.
I came across this article at Slate.com this morning that was dead-on, humourous and an eye-opener about writing recipes. The writer accuses recipe writers of lying about how long it takes to caramelize onions, because the long cooking time is a deterrent to a recipes appeal. 
The article concludes: "The best time to caramelize onions is yesterday".
Earlier in the week I caramelized about 3 pounds of onions in a dutch oven. I was left with about 2 cups of gooey good onions. It keeps in an airtight jar for a week, though rarely lasts that long. I use caramelized onions in all kinds of ways, the breakfast tacodilla is it's most frequent destiny.

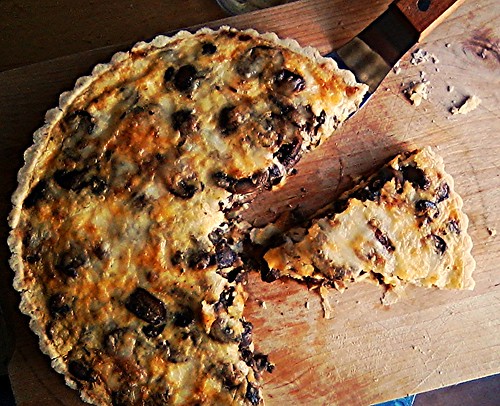
 I've been in  pastry mode for a couple of weeks now, so when I scored  giant bag of button mushrooms from the Chinese market I knew a tart was in my immediate future. This is a hybrid of recipes adapted from Smitten Kitchen and Dorie Greenspan's Around my French Table.

caramelized onions-again, way more than you need for this recipe and do this ahead of time. A dutch oven is great when cooking a large batch because the cast iron has great heat distribution, there's a lot of surface area to promote browning.

2 tablespoons oil
3 large yellow onions (sliced 1/4 thick)
1 teaspoon salt
black pepper
1 teaspoon red wine vinegar

Heat the oil in dutch oven on medium-high heat and then add the onions. Toss until the onions are coated and cook until they start to brown, stirring infrequently, just to redistribute the onions so they come in contact with the surface of the pot. Once the browning starts (it take's about 20 minutes to get there), add salt, lower the heat and cover the pot and cook for another 20 minutes so the onions release their moisture and get really soft.
Remove the cover and continue to cook for another 30 minutes until the water evaporates and the onions become brown. De-glaze with red wine vinegar at the end.

Pastry
from smitten kitchen

1 1/4 cups flour
1 tablespoon plus 2 teaspoons cornstarch
1/4 teaspoon salt
6 tablespoons butter, diced
1 egg

In the food processor pulse the dry ingredients to combine. Pulse butter until it's in bits the size of small peas. Pulse in the egg until the dough forms.
On a floured work surface roll the dough into a 12 inch circle, carefully roll it over the rolling pin to lift it off the counter and into the tart pan. Press the dough into the corner of the pan and trim off the excess. If you're using a fluted tart pan with a removable base lift the tart pan by the edge and put it onto a plate. Cover with plastic wrap and chill for 30 minutes.

filling:

2 tablespoons butter
1 pound white button mushrooms-stems removed, sliced
1/2 teaspoon salt
1 teaspoon dried tarragon
1 cup of beef stock ( or vegetable stock)
1 tablespoon fresh thyme
1/2 cup caramelized onions
2 eggs
1/2 cup heavy cream
1/2 cup fontina cheese (or gruyere)
salt
pepper
nutmeg
1 teaspoon dijon mustard

Preheat the oven to 350 degrees.
Remove the chilled tart shell from the fridge. Line with foil or parchment and weight the pastry down with pie weights, dried beans or rice. I keep a jar of white beans labeled For Pastry and re-use.
Bake for 10 minutes, remove the weights, foil or parchment and bake for another 5 minutes, until the pastry appears dry, but not browning.
Remove from the oven and brush with dijon mustard. Set aside
While the pastry is par-baking (also called blind baking) heat up a  large skillet over medium high heat, melt the butter until it stops foaming. Add the sliced mushrooms and toss to coat, then let them cook undisturbed, about 5-7 minutes until they start to brown. Toss again to redistribute and continue to brown. Add the salt, pepper and tarragon. The mushrooms will release their water. Cook uncovered until the water evaporates and a fond  (the browned bits) forms on the skillet. Add the beef broth and de-glaze the skillet. Continue to cook until the broth reduces. Remove from the heat and stir in fresh thyme.
In a small bowl or a large pyrex measuring cup, wisk the eggs, cream, salt, pepper and nutmeg together then stir in the grated cheese.
Place your par-baked tart shell on a sheet pan, spoon in the caramelized onions and spread it evenly over the bottom. Then add your mushroom layer spreading it evenly over the onions. Pour the egg mixture over the surface.
Place the sheet pan on th middle rack of the oven and bake for 35-40 minutes until the center is puffed and brown. Let it rest for about 10 minutes, remove the fluted ring from the base. Slice and enjoy with a big green salad.
This tart re-heats nicely and I pack it for lunch.


Sunday, January 6, 2013

Jamaican Beef Patties


Jamaican Beef Patties, originally uploaded by riptideredsf.
The little kitchen has run amok in pursuit of  pastry perfection in a quest to create the ultimate Jamaican Beef Patty. I also made a crazy-good Mushroom and Caramelized Onion tart.
Jamaican Beef Patties are the bomb, but unless you've been to Jamaica, London, Toronto or the east coast, you've probably never known the fast-food pleasure these spicy little pies can bring. They're the Jamaican version of empanadas. I discovered them back in the 90's whilst pursuing higher education at NYU. Ray's Pizza on Waverly Place, where a big cheese slice and a meat pie could feed the starving student for a mere $3.00, was pretty much a daily habit. So bad, but yet so good.
Those savory crazy yellow pies were greasier than all get-out, filled with spicy ground meat the texture of paste (much like the meat inside those hang-over cure, crack-in-the-box, deep fried tacos), and spiked me up a good 30 pounds in the process.
Fast forward to about a year ago when I first stumble across this vegan version at 101 Cookbooks. I had not thought about these in the 10 years I'd been back in California. Outta sight outta mind. I'm excited by the possibility of reintroducing these into my life-especially a healthy vegan version! I make them and they're almost brilliant. It's the pastry that diminishes it's ultimate perfection. It's ok, but it just doesn't have the  flake I want. I know that's my fault because I suck at pastry.
Looking for the beef, I came across this recipe from Emeril. Again-good, but not quite the flavor I think I remember (which most certainly comes from fast food preservative chemicals).
My ADD-led brain pulls me elsewhere and the Jamaican Beef Patty is abandoned.
Now it's back. I dust off my two recipes and I go a-googling. I'm a bit shocked to discover only a handful of recipes. Why is nobody making these? Empanadas everywhere, but nary a JBP in sight.

Over the weekend I went all ATK on these.


Jamaican Curry Powder
from allrecipes.com
1/4 cup whole coriander seeds
2 tablespoons whole cumin seeds
2 tablespoons whole mustard seeds
2 tablespoons whole anise seeds
1 tablespoon fenugreek seeds
1 tablespoon whole allspice berries
5 tablespoons ground turmeric

Toast the whole spices in a non-stick skillet over medium heat until slightly darkened, about 10 minutes. Grind the toasted spices in a spice grinder with the turmeric.
This recipe makes way more than you need for the meat mixture. It's nice to keep on hand for other things like soup or chicken.

Pastry
adapted from 101 cookbooks

1 1/2 cups all purpose flour
1 cup whole wheat pastry flour
2 teaspoons turmeric
1/2 teaspoon fine sea salt
3/4 cup (1 1/2 sticks) cold butter cut into 1/2 inch dice
1/2 cup plus 2 tablespoons ice water

Meat Filling
adapted from the Food Network

2 tablespoons coconut oil
1 large onion, finely chopped
6 cloves garlic, minced
3 tablespoons Jamaican Curry Powder
1 pound ground beef
1 scotch bonnet or habanero pepper, seeded and finely chopped (optional) or
        1/2 teaspoon red pepper flakes
1 cup beef stock
3/4 cup coconut milk
1 1/2 teaspoons sea salt
fresh ground black pepper
3 tablespoons dark Jamaican rum (optional)
1 tablespoon whole grain mustard

For the pastry: Combine flours, turmeric and salt in the work bowl of a food processor or wisk together in a large mixing bowl. Toss in butter and pulse until it reaches the consistency of fine crumbles, or use a pastry blender, or rub with your finger tips (about 10 pulses or 10 minutes).
Combine the vinegar and water and mix well. Add the water/vinegar mix slowly in the food processor or by the tablespoon into the bowl, while stirring, just until the dough comes away from the side of the bowl. It will still look crumbly, but should hold together when you pinch the dough. Dump it on a floured work surface and squeeze it together into a tight ball, flatten, cover in plastic and refrigerate for at least an hour or over night.
For the filling: Pre-heat the oven to 350 degrees. In a large skillet, on medium-high heat, melt the coconut oil. Add the diced onions and cook until the onions are softened, about 8 minutes, add the garlic and the spice mix and cook for another 2-3 minutes until the spices become fragrant. Add the ground beef, breaking it up and cooking until it loses its pinkness. Add the habanero and beef stock and cook until the liquid reduces. Add the coconut milk and reduce. Season with salt and pepper. Add the rum and reduce. Take off the heat and finish with the whole grain mustard. Let the meat cool for about 30 minutes.

Line a baking sheet with parchment.
Remove the pastry from the refrigerator and divide the dough into 8 pieces. Working with one piece at a time, roll into a ball and then flatten it onto a floured work surface. With a rolling pin, roll into a 6-8 inch circle. Wet the edge of the dough, place a scant 1/4 cup of meat on half the dough and press lightly with your hand or the back of a spoon to flatten it a bit. Fold the dough over the meat and press the edges closed with your fingers and then crimp with a fork.
Pierce the top with a knife to vent.

Bake for 30-35 minutes.


Friday, January 4, 2013

Cashew Butter Balls


It's a week into the New Year and I've only just come up with my resolution. I have only one: To learn some thing new. Every day. It will probably be kitchen related most likely, but I'm keeping my eyes and ears wide open. Really, we all learn new things everyday. We just don't always remember them, or think them relevent enough to our lives to take particular note of.
This one's pretty simple, general and as good of a place to start as any:
You CAN teach an old dog new tricks.
So, I start this year with a new take on an old favorite. Back to back posts on what is essentially the same cookie. The subtle differences that make one damn good and the other one sheer bliss.
These Cashew Butter Balls are a gigantic leap forward for what I thought was the crowning stand-out of my holiday baking-the Mexican Wedding Cakes, or what I started calling Sugar Bombs. They are always the first to disappear from every cookie tray or tin I've turned out for the last 10 years. I thought that they were perfect just they way they were. If it ain't broke, don't fix it. So many recipes, so little time...and all that jazz.
Yet, when a post as timely and gorgeous as Smitten Kitchen's pops up on my radar, I get all twitchy with anticipation. I attempt to wrangle my kitchen OCD for the greater good and go all ATK on these bad boys.  So much so, that I was compelled, for the first time ever, to bake AFTER Christmas. That's saying something.
These were brilliant. I love them so much that I have started my new tradition of The New Year Cookie. I gifted these to friends I met up with between Christmas and New Year's Day. I made up two gift boxes, saving about 6 for myself. I was actually going to bring them to the cafe and share them with Sheena, but they never made it. Once I ate the first one and it was so delightful, I had to have another, just to make sure I wasn't over-reacting. Once I ate the third, it was all over. These buttery, sweet, melt-in-your-mouth bites of nutty heaven are addicting. I dub thee Crack Cookies.
I suspect, if I never make another cookie but this, for the rest of my life, I shall make all of my friends and family very happy as they curse the crap outta me.